Latest News

Showing posts with label Registrar. Show all posts

The Mysterious "Destination" / "Points To" Label

Some blog owners buy domains, for publishing a Blogger blog, and ask about how to address the domain.
What address do I use for "Points to"?
Other owners may ask a similar question, referencing "Destination" or maybe "Target".

There is no real difference, between all 3 labels. "Destination", "Target", and "Points to" all refer to the same DNS address value.

To compound the confusion, 4 different addresses are required, when addressing a Blogger custom domain root.

Defining the DNS servers used by the domain root ("naked domain") requires 4 address records - and the labels used, in the zone editor, will vary from registrar to registrar.

We know of 3 different labels, used by Blogger custom domain instructions.

The referential Blogger document How do I use a custom domain name for my blog? uses 3 labels to identify the 4 name servers, which are provided by Google. Blogger uses the triplet label "Destination, Target, or Points to" as their example.

Google provides 4 name servers, to give us multiple redundancy.

Google provides four mutually redundant individual servers, each responding to a specific IP address - for custom domain clients to address the domain root, in a round robin sequence.

There are 4 name servers provided by Blogger, to address a custom domain root.


Each domain root name server entry uses 2 important label values ("Name, Label, or Host" - and "Destination, Target, or Points to").

Each label may have 1 of 3 values, depending upon the zone editor provided by the registrar.

Here is the Dig Log, for the domain root. Look at the 2, 4, 6, and 8, in the 4 address entries.

mydomain.com. 3600 IN A 216.239.32.21
mydomain.com. 3600 IN A 216.239.34.21
mydomain.com. 3600 IN A 216.239.36.21
mydomain.com. 3600 IN A 216.239.38.21

In the GoDaddy zone editor, you'll see these entries depicted as

  Host   Points to           TTL
  @      216.239.32.21    1 Hour
  @      216.239.34.21    1 Hour
  @      216.239.36.21    1 Hour
  @      216.239.38.21    1 Hour

The GoDaddy zone editor uses the labels "Host" and "Points to".

Similar labels ("Name", "Label" and "Destination", "Target") are used by various other registrars, in their own zone editor.

A Zone Editor display, showing the base DNS addresses, for GoDaddy.

Here is the display, used by GoDaddy, for "nitecruzr.co.uk".


Here is the zone editor display, as provided by GoDaddy.

Do you see the 4 address records, beneath "Points to"?


The labels in the address records differ, from registrar to registrar. The "Name, Label, or Host" address values (here, shown as "@") will differ, from registrar to registrar - but the "Destination, Target, or Points to" address values will not differ. A properly addressed domain will have the same 4 "Destination, Target, or Points to" address values, as every other properly addressed domain.

mydomain.com. 3600 IN A 216.239.3n.21

Each address will have one of four values for n: 2, 4, 6, or 8.

Complementing "Destination, Target, or Points to", we have another label set.

Complementing the 3 "Destination, Target, or Points to" label address values, for addressing the 4 name servers provided by Google, we have a similar set of 3 "Name, Label, or Host" label address values.

Addressing "Name, Label, or Host" is somewhat simpler - as all 4 entries are identical to each other, for any domain root address entry.

The Blogger instructions, like the GoDaddy zone editor, use "@", when addressing the domain root. The zone editor value used, however, may differ from registrar to registrar.

Any blog owner, wishing to have a working custom domain, needs to understand how to setup a domain for the registrar involved.

The end result.

Both the "Name, Label, or Host" - and the "Destination, Target, or Points to" - label triplets are only examples. Other unidentified registrars may use other labels.

Considering the Blogger instructions, and the terminology required, Blogger Help Forum: Get Help with an Issue will not soon run out of blog owners, requesting assistance for making their custom domains work.


Some #Blogger blog owners, in the process of setting up their blogs using custom domain publishing, find that labels "Name", "Label", or "Host" - and "Destination", "Points to", or "Target" - are only examples, in the Blogger Help document.

There is no attempt at standardisation, used by the thousands of different Internet registrars, in their dashboards (aka "zone editors").


https://productforums.google.com/forum/#!category-topic/blogger/kMDo0O1xtDM

Custom Domain Setup, And The Blogger Instructions

Custom domain setups continue to confuse blog owners - and lead sometimes to frustration, expressed in Blogger Help Forum: Get Help with an Issue.
When I am trying to set up a custom domain for my new blog, I'm not getting the 2nd CNAME Record, but the settings get saved.
In some cases, the domain may be operational - and other times, the domain will be broken, and no corrective instruction is provided.

The details in the instructions, Blogger Help: How do I use a custom domain name for my blog?, are misleading - and have resulted in broken domains.

The Blogger instructions are confusing.


5. Go to your domain registrar's website and locate the DNS (Domain Name System) settings in the control panel.

Not a lot of details, there.


10. Before you move onto the final step, wait about an hour for your DNS settings to activate. If you attempt the final step before your settings are activated, we'll let you know with a warning message.

All registrars don't use "3600" second TTL.


That's 2 examples of possible problems.

Publishing a blog to a custom domain is so much easier - and produces more reliable results - if you follow basic principles.

  • Learn to use your registrar's zone editor.
  • Learn to read a Dig log.
  • Setup the DNS addresses, for your domain.
  • If necessary, add domain ownership verification.

Learn to use your registrar's zone editor.

The registrar dashboard / zone editor is the portion of the registrar's website, that is created to let you, the domain owner, setup your own domain.

The zone editor is unique, for every different registrar - just as every website is different. One of the signs of uniqueness is hinted, by Blogger.

Each CNAME is composed of two parts - Name, Label or Host and Destination, Target or Points to.

These two (only two) terms here refer to the most essential details, in the zone editor, that make your domain operational. The two details have no consistent names - so we use examples.

The first CNAME is the same for everyone, Name being "www" and Destination "ghs.google.com."

That one sentence is the most essential, for all domains. It looks so simple - but it's so easy to get it wrong. Not every blog owner will see "Name" and "Destination" in the zone editor display. This leads to many imaginative - and wrong - alternatives.

Each registrar labels their zone editor, as they see fit. I've seen other terms used, in addition to the 6 implied. Both "Name, Label or Host" and "Destination, Target or Points to" are merely three examples, for each of these two essential elements.

These details are only hinted, by the Blogger instructions.

  1. Go to your domain registrar's website and locate the DNS (Domain Name System) settings in the control panel.
  2. Now it's time to enter the CNAMEs. Where it says Name, Label or Host simply enter "www" and list ghs.google.com as the Destination, Target or Points to.

Learning how to look, in the zone editor, is much more reliable than being told what to look for.

Learn to read a Dig log.

Compared to the confusion behind the registrar's zone editor, a Dig log is simplicity.

There are three basic DNS configurations, which produce a reliable domain for publishing a Blogger blog. 99.99% of all blog owners will use only one of the three.

ourdomain.com. 3600 IN A 216.239.32.21
ourdomain.com. 3600 IN A 216.239.34.21
ourdomain.com. 3600 IN A 216.239.36.21
ourdomain.com. 3600 IN A 216.239.38.21
www.ourdomain.com. 3600 IN CNAME ghs.google.com.

This is the asymmetrical DNS address configuration. Excepting one known variation, the asymmetrical configuration - with no options - is most reliable.

Setup the DNS addresses, for your domain.

As long as you have access to the zone editor, and understand the above issues - "Learn to use your registrar's zone editor" and "Learn to read a Dig log" - the rest will fall into place.

Unfortunately, not everybody has zone editor access. Similar to Blogger dashboard access, registrar dashboard access is not always a done deal.

Even having zone editor access, the Blogger instructions can mislead.

  1. Optional: You can also enter A-records, which links your naked domain (example.com) to an actual site (www.example.com). If you skip this step, visitors who leave off the "www" will see an error page.
  2. Optional continued: After completing Step 8, enter your domain name in the format example.com, and list the I.P. addresses shown below in the "A" section. You'll need to create four separate A-records which point to four different Google IPs.

Many problems, reported in the forums, indicate that using the domain root properly is (should be indicated as) a necessity.


Once again, the domain root, configured properly, should not be suggested as an option.

  1. Before you move onto the final step, wait about an hour for your DNS settings to activate. If you attempt the final step before your settings are activated, we'll let you know with a warning message.

All registrars don't use one hour TTL.

Be careful of the TTL setting. Unless you know better, stick with the registrar's TTL setting - and try to understand the effects of TTL latency.

If necessary, add domain ownership verification.

Returning to the Blogger instructions, we see

The second CNAME is particular to your blog and your Google Account, and is therefore different for each person.

Not every blog owner will see the second CNAME - whether or not the domain is properly setup.

The Blogger dashboard Publishing wizard only displays the "Error 12", and the second CNAME, under specific conditions. In some cases, the blog will be published to the domain - and the second CNAME will not be provided.

You may not see the instructions for the second "CNAME", until your base addresses are right. If you need the second "CNAME", the "Error 12" display will provide details - when the base addresses redirect properly. If the blog publishes, a second "CNAME" is not necessary.

That is my suggestion. Get the addresses right, before you start - then publish to the domain URL.

If the blog publishes to the domain, and the addresses are wrong, the domain will be broken - or unreliable.

The bottom line.

It's good to have instructions, they suggest the need for proper domain setup technique. Just don't be surprised if following them blindly gives you a broken domain - and an offline blog.

If you are lucky, the blog will appear offline immediately after using the Publishing wizard - and you will know that there is a problem to be fixed. Other times, you (or some readers) might not realise a problem until months or years later.

In the latter case, we'll see you, one day, in Blogger Help Forum: Get Help with an Issue.
I published my blog to my private domain, last month - and the blog pageviews have been in the crapper, ever since!


The instructions supplied by #Blogger, for setting up a custom domain published blog, can be misleading. Blindly observed, they can lead to an immediately offline blog - or to a blog that is online for some, and intermittently offline for others.

https://productforums.google.com/forum/#!category-topic/blogger/Jv0fT5cws3U

Don't Always Blame Blogger, With Your Blog Down!

Some of my favourite problem reports, in Blogger Help Forum: Get Help with an Issue, are about inconsistent blog online status.
It was fine yesterday. Why is it down, now?
and
I see the blog, just fine! Why are some of my readers complaining?
and
I can access it, using my phone! Why is Blogger down, on my home computer?
and
The registrar tells me everything is OK!
Whenever I see the latter report, I know exactly where to start.

Particularly when I see the latter symptom, I know exactly where to start.

The registrar tells me everything is OK!

The "registrar says" is a frequent indicator of the problem. I'm not naming names, but the initial "G" (and not "Google") is very frequently involved, in this case.

So, I start with a Dig log, for the domain. And 99% of the time, that's all that is needed.

Bogus DNS addresses are a very commonly seen diagnosis, in so many of these cases. For 99.99% of the blogs, published to a custom domain, there is simply no effective substitute for the "Asymmetrical DNS" setup, provided long ago.

  • Maybe the blog will be up for you, and some would be readers - but others will be seeing the "404".
  • Maybe it was fine, yesterday - and today it is suggesting spam and viruses.
  • It will only work, for some people, some of the time. That is the only constant.

So you call the registrar - and they tell you that it has to be Blogger, because they have no problem accessing it. But the registrar is part of the problem.

The righteous address setup.

mydomain.com. 3600 IN A 216.239.32.21
mydomain.com. 3600 IN A 216.239.34.21
mydomain.com. 3600 IN A 216.239.36.21
mydomain.com. 3600 IN A 216.239.38.21
www.mydomain.com. 3600 IN CNAME ghs.google.com.

The domain root uses 4 x "A" addresses, accessed in a round robin sequence. And the published URL uses a single "CNAME", resolved using a complex name server array. With both domain root and "www" alias properly addressed, your blog has much better chance of being consistently and reliably accessed.

One possibly righteous address setup.

One Blogger Engineer recommended a modified version of the asymmetrical DNS setup, to be used by 1&1 customers. Only time will tell if this setup is reliable. I have seen several 1&1 customers, this year, suggesting that this is not long term reliable.

mydomain.com. 3600 IN A 216.239.32.21
www.mydomain.com. 3600 IN CNAME ghs.google.com.

Some spurious address setups.

Spurious address setups are unlimited, in variety. Here are a random 3 examples, from recent forum history.

Error when adding domain

https://productforums.google.com/d/topic/blogger/WvW2yZaS-FI/discussion

When i am trying to adding the domain it shows the error
Whoops, that's an error! (bX-6g9yx1)

socialsfriend.com. 600 IN A 184.168.221.33
www.socialsfriend.com. 3600 IN CNAME socialsfriend.com.

Blogger appears to be detecting this setup as a problem - and throws a bX code, to indicate a problem.

Mobile Redirection Failure

https://productforums.google.com/d/topic/blogger/rAJgN8pYdPw/discussion

When I am on mobile on google chrome (only browser I tested).

chartlearning.com does not redirect to www.chartlearning.com on mobile.

chartlearning.com. 600 IN A 50.63.202.10
www.chartlearning.com. 3600 IN CNAME ghs.google.com.

This blog is online - and visible, using broadband - but no domain root redirection, for mobile browsing. "50.63.202.10" is not a Blogger / Google name server, and won't provide reliable redirection.

Can't publish my blog

https://productforums.google.com/d/topic/blogger/ibGqKLWXhO8/discussion

When I entered the "eac-leadership-consulting.com" domain in 3rd-party domain settings, I did not receive an error. I did not see the 2 CNAME records.

eac-leadership-consulting.com. 600 IN A 50.63.202.50
www.eac-leadership-consulting.com. 3600 IN CNAME eac-leadership-consulting.com.

This blog published - but ownership verification did not provide the required second "CNAME".

The bottom line.

There simply is no substitute for righteous DNS addressing, for custom domain publishing. Publishing to a custom domain is not a productive activity, if you cannot follow instructions.


The ability to publish a #Blogger blog to a non BlogSpot URL has been provided, for almost 10 years. Some blog owners still cannot setup the domains properly - and remain oblivious, when a problem arises.

Learn why there is one effective DNS address setup, for custom domain publishing.


If you want a reliable custom domain, this is the address choice.

The DNS TTL Setting Is Chosen By The Registrar

Some blog owners, publishing their blog to a custom domain, wonder about the mysterious TTL setting for the domain.
What is "3600"? Why do I see "7200" in my Dig log?
and
Why do I have to wait 8 hours, after changing my DNS addresses?
DNS latency (aka "TTL") is not understood, by many blog owners. A mistake in setting TTL can cause anger and frustration.

"Time To Live" aka "TTL" is a registrar individual setting, that is used for providing proper performance from the registrars name servers and network.

TTL controls caching of the DNS addresses, used to access your domain.

TTL indicates how long a DNS address will remain in cache, on a computer, before that computer requests an updated value. It's an essential (but obscure) component, in setting up a custom domain.

Since you're reading this blog, your computer has the address of this blog in cache - and won't be requesting an update, until "TTL" for "blogging.nitecruzr.net" expires. GoDaddy, the registrar for "nitecruzr.net", uses "3600" seconds, or 1 hour TTL.

Your computer probably uses the nameservers provided by your ISP - and your ISPs nameservers get updates from the nameservers provided by GoDaddy. Changes to "nitecruzr.net" go from Google, to GoDaddy, to your ISP, to your computer - and TTL applies to each DNS cache.

A typical Dig log, for a domain with a low TTL value.

Look at a Dig log extract, for "nitecruzr.net".

http://www.digwebinterface.com/?hostnames=nitecruzr.net%0D%0Ablogging.nitecruzr.net&type=A&useresolver=8.8.4.4&ns=auth&nameservers=

nitecruzr.net. 3600 IN A 216.239.32.21
nitecruzr.net. 3600 IN A 216.239.34.21
nitecruzr.net. 3600 IN A 216.239.36.21
nitecruzr.net. 3600 IN A 216.239.38.21
blogging.nitecruzr.net. 3600 IN CNAME ghs.google.com.

You set the TTL, for each individual DNS address, when you setup your domain. The registrar provides a recommended TTL - but most registrars let you select a different setting, within a given range.

A lower TTL ("600" seconds or 10 minutes) provides faster refresh after a change is made - but puts more load on the registrars name servers, and requires a more responsive network.

A higher TTL ("7200" or 2 hours) provides slower refresh - and puts less load on the registrars name servers. And when a change is made, by Google, a higher TTL can cause problems.

If you don't understand DNS, you will be better off not changing from the registrar recommended setting. Some registrars won't even have a TTL setting, in their zone editor - and others may hide it, behind an "Advanced" menu or similar.

If you generate a Dig log for your domain, you'll see the TTL settings for your addresses.

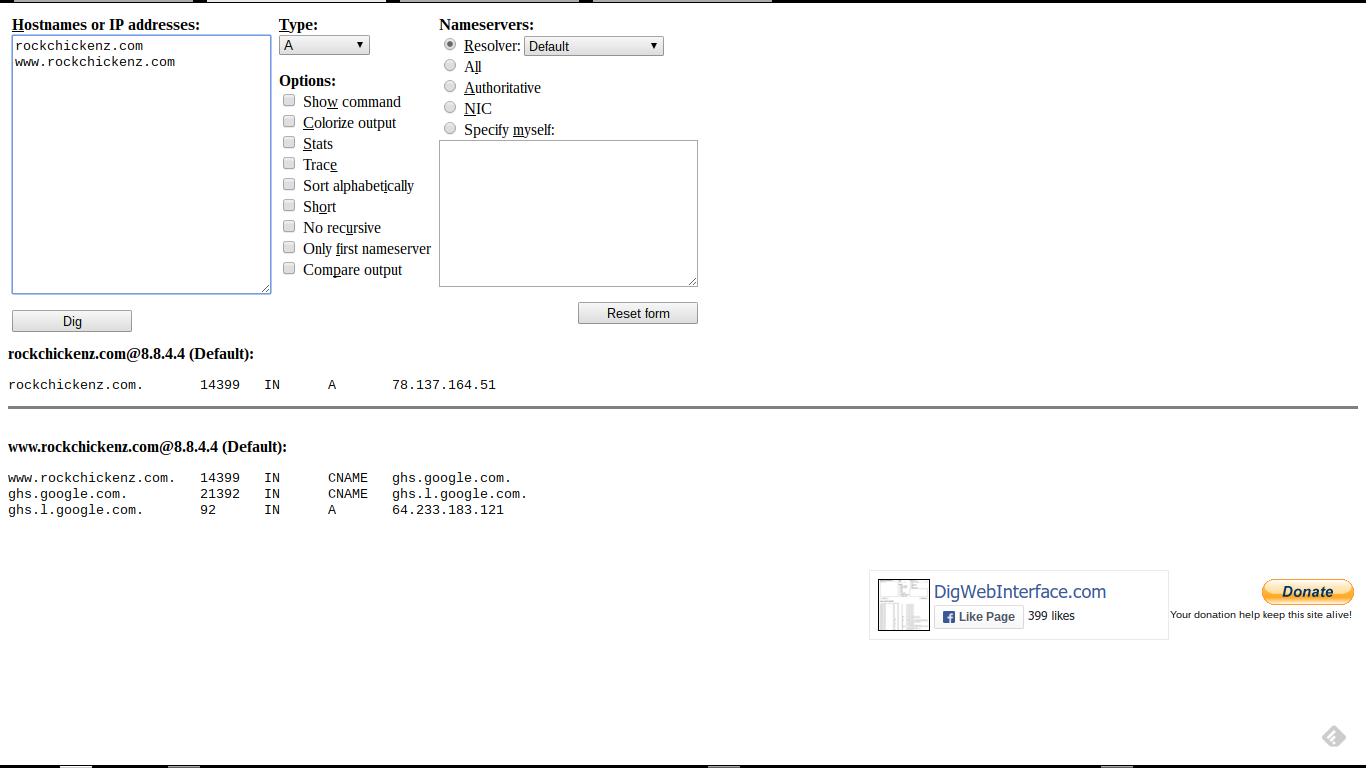
A typical Dig log, for a domain with a high TTL value.

Look at a Dig log, for "rockchickenz.com".


Here, the current DNS addresses (correction pending).


Here, we see a TTL of "14400" (displayed as "14399") - or 4 hours.


rockchickenz.com. 14399 IN A 78.137.164.51
www.rockchickenz.com. 14399 IN CNAME ghs.google.com.

For best results, we suggest that you wait 2 x TTL, after making DNS changes.

I recommend waiting 2 x "TTL", after making any DNS changes, before acting from those changes. Having diagnosed the painful "Another blog ..." domain database corruption, too many times, I suggest this whenever possible.

After you correct the addresses, please wait 8 full hours (2 x "14400" seconds) before continuing. This will let all DNS servers on the Internet receive the corrected addresses.

In many cases, TTL will be "3600" or "1 hour" - and with a typical forum diagnostic session taking several hours between posts, a one or two hour TTL is transparent to the forum discussion.

With domains using 4 hour TTL, suggesting that the blog owner wait 8 full hours after making the change, before re publishing the blog to the domain, makes sense. And a 2 full days, for "86400" seconds, makes even more sense.

And getting a righteous DNS address complement verified - before re publishing - makes the most sense.


DNS TTL latency, which affects accessibility of every #Blogger custom domain published blog, is not understood by many blog owners. To provide a stable domain - and a more visible blog after it's published to a custom domain - every blog owner should understand this obscure detail.

Renewing Your Custom Domain Registration

Some Blogger blog owners, having experienced the anxiety of custom domain setup, intend to carefully maintain their domain registration.

We see a few queries, in Blogger Help Forum: How Do I?, about domain registration renewal.
How do I make sure my registration gets renewed?
or
How do I renew registration before it expires?
or, possibly
My blog now displays a search page! Have I been hacked?

Some registration issues will depend upon how the domain registration was originally purchased.

Domains purchased directly from a registrar - whether using eNom, GoDaddy, or a third party registrar, will have to be renewed directly from the registrar. It's not possible to migrate a direct purchase to Blogger / Google registration for payment, any more than to use the Blogger / Google automatic DNS setup. Once you purchase domain registration from a registrar, you are on your own.

If you used Blogger "Buy a domain", Google Apps, or Google Wallet, to purchase the domain registration, you should get email reminders when registration is expiring. However, this will depend upon whether your Blogger / Google account, under which you purchased the registration, uses an active and accessible email address.

If you choose to anonymise yourself by using a bogus or inactive email address for your Blogger or Google activities, don't expect to get email reminding you, or allowing you to renew domain registration.

The most reliable way to assure the domain remains registered is to use domain auto renewal. You can check your auto renewal settings using the Google Apps administrator account, for the domain (now called the "Admin Console"). Be aware of the oddities of the Google One Login wizard, and Google Apps, when logging in.

For domains purchased before December 2012, you'll use email from Google Apps, or an entry in your Google Wallet log, to retrieve the token to setup your Google Apps account. For domains purchased after November 2012, you will have only a limited access Google Apps account, which you should reset the password, to access.

If you intend to use domain auto renewal, make sure that the bank account (credit, or debit) is active, and currently paid. If your bank rejects the payment, you should get a notice - but again, this will come reliably when the email account associated with the domain is active and accessible by you.

Procedures for renewal after expiration are different - and may cost substantially more than the normal yearly fee.

The best renewal experiences, of course, start with advance planning.

>> Top

Using "Buy a domain", From Outside The USA

As custom domain publishing becomes more popular with Blogger blog owners, it's inevitable that people outside the USA would start using it, routinely.

Questions about payment options are seen regularly, in Blogger Help Forum: How Do I?.
How much does a domain cost?
This used to have a simple answer.
$10 US, charged against a major bank issued credit card.

With the internationalisation of Blogger, the answer becomes significantly more complex.

Using Google Wallet, one may purchase a domain in over 230 countries.
The Google billing system accepts payments in over 230 countries with an international credit card.

We now see mention of specific payment methods which are not accepted - though they appear to be important enough to be documented by Google.
  • Health Savings Account (HSA) cards.
  • Transit cards.
  • Western Union/Money Gram.
  • Any escrow type of payment.

From what I have observed, using a bank issued credit card involves pretty complex "peer to peer" type transactions, between at least 3 parties.
  1. Google.
  2. The bank providing the credit account for the blog owner.
  3. The bank providing the payment account for the registrar.

Item #2 provides intriguing options.
  • American Express (USD Only).
  • Discover (USD Only).
  • MasterCard.
  • Visa.
  • Visa Electron (Outside of US Only).
I have no idea what #3 may involve, internationally. I know that accepting payments, even within the USA, is not as simple as making purchases.

If these options do not satisfy you, personally, you are entitled to purchase a domain from almost any registrar which provides an acceptable payment method. However, you will need to accept some responsibility for the technical details involved, in setting up the domain.

The complexities of International Banking will make "simple" purchases such as non BlogSpot URLs, for Blogger blogs, interesting to watch.

>> Top

Adding Ownership Verification For Your Custom Domain? Examine The Error Display

Sometimes, you have to step outside the box, to complete a Blogger blog task.

The task of adding domain ownership verification, to a custom domain purchased using "Buy a domain", is one example of stepping outside the box. I advise people that tweaking DNS settings, in general, is a task best undertaken by someone with "Advanced" experience with Blogger custom domain publishing.

Unfortunately, domains purchased using "Buy a domain" are occasionally subject to incomplete setup - and correction of an incomplete setup involves republishing the domain. And republishing the domain requires verification of domain ownership.

To a first time domain owner, the task of verifying domain ownership is surely a bit scary.
We have not been able to verify your authority to this domain.

This initial accusation is followed by the instructions
On your domain registrar's website, locate your Domain Name System (DNS) settings and enter the following two CNAMEs:

The challenge, for many, is getting to the Domain Name System (DNS) settings, aka the Zone Editor.
  1. Login to Google Apps.
  2. Find the instructions for logging in to the registrar's website.
  3. Login to the registrar's website.
  4. Find the registrar's Zone Editor wizard.

Having completed Steps #1 - #4, adding the "CNAME" is almost an anticlimax. See the instructions?


On your domain registrar's website, locate your Domain Name System (DNS) settings and enter the following two CNAMEs:

Name, Label, or Host field Destination, Target, or Points To field

www ghs.google.com

i7vgls457wxc gv-fbz2zptam3ucji.dv.googlehosted.com

Once you have access to the Zone Editor, look for "www", added by "Buy a domain". See how it's formatted, in the display?
  • Add the second "CNAME", mirroring the format and syntax of the first.
  • Note the example of the second, shown here as "i7vgls457wxc" - though when you setup your domain, you will surely see different values for both "i7vgls457wxc" and "gv-fbz2zptam3ucji.dv.googlehosted.com")
  • Refresh the Zone Editor list, and compare the "www" and "i7vgls457wxc" entries.
  • If you added the new entry properly, the format and syntax, of the two entries, will be identical.

Having successfully added your new "CNAME", go back to the Blogger Publishing wizard, and publish the blog to the domain. Finally, wait a few days for Transition to expire - and while you wait, plan what to do, next.

>> Top

Forwarding A Domain Requires Experience

I constantly advise Blogger blog owners to avoid forwarding, when setting up custom domain publishing.

In the rare cases where forwarding is actually required, not every blog owner reports success.
My blog now displays a non Google search page!
or worse
My blog now displays
404 Not Found
What did I do wrong??
Depending upon what setup work was done by the blog / domain owner, and what effort is required by the registrar, one may expect to see, quite predictably, either of the above errors.

When you just publish your blog to the primary domain, you're using the Blogger Publishing wizard.

Many domains will require two settings, to forward a domain.

When you forward a secondary domain to the primary domain, you're using the DNS Manager wizard provided by the registrar, for that secondary domain. Frequently, this is a 2 step process.

  1. You use the DNS Manager for the secondary domain, and designate the primary domain as the forwarding target for this domain.
  2. You setup a DNS address for the secondary domain URL, and target the redirection server - as provided by the DNS host.

Some domains may make one setting, for you, automatically.

Some wizards will handle one step for you automatically, while others will require that you do both steps separately. I have had both experiences, when forwarding different domains using the GoDaddy DNS manager. You may need to experiment, here - or ask an experienced technician at the registrar, for advice.

If both settings are not made, the domain will not forward properly.

If your zone editor requires that you perform both steps separately, and you only do the first, your domain gets redirected to the redirection server. If you don't define a redirection target, you have a parked domain, similar to an expired domain - and your domain will serve the ads display page provided by the registrar.

If your zone editor requires that you perform both steps separately, and you only do the second, your domain will be properly redirected from the redirection server - but the redirection server will not be defined, for your domain. If the redirection server isn't defined, the domain will be "404".

You may need to contact your registrar, for detailed instructions.

If your registrar does not provide explicit instructions - or if you use the domain manager wizard and get either of the above results, it may be time to contact a registrar customer service representative - and possibly, insist on support from a senior technician. Using a third party registrar, or a third party DNS hosting service, you may have to improvise.

Forwarding a domain - when you must serve two domains (or more) from one blog - is simply not a task for the inexperienced.

The Task Of Forwarding A Domain Requires Experience, Persistence, And Research

I constantly advise Blogger blog owners to avoid forwarding, when setting up custom domain publishing.

In the rare cases where forwarding is actually required, not every blog owner reports success.
My blog now displays a non Google search page!
or worse
My blog now displays
404 Not Found
What did I do wrong??
Depending upon what setup work was done by the blog / domain owner, and what effort is required by the registrar, one may expect to see, quite predictably, either of the above errors.

When you just publish your blog to the primary domain, you're using the Blogger Publishing wizard.

Domain forwarding frequently requires two steps.

When you forward a secondary domain to the primary domain, you're using the DNS Manager wizard provided by the registrar, for that secondary domain. Frequently, this is a 2 step process.

  1. You use the DNS Manager for the secondary domain, and designate the primary domain as the forwarding target for this domain.
  2. You setup a DNS address for the secondary domain URL, and target the redirection server - as provided by the DNS host.

Some wizards will handle both steps for you automatically, while others will require that you do both steps separately. I have had both experiences, when forwarding different domains using the GoDaddy DNS manager. You may need to experiment, here - or ask an experienced technician at the registrar, for advice.

The registrar may require both steps, done by you separately.

If your registrar requires that you perform both steps separately, and you only do the first, your domain gets redirected to the redirection server. If you don't define a redirection target, you have a parked domain, similar to an expired domain - and your domain will serve the ads display page provided by the registrar.

If your registrar requires that you perform both steps separately, and you only do the second, your domain will be properly redirected from the redirection server - but the redirection server will not be defined, for your domain. If the redirection server isn't defined, the domain will be "404".

With no instructions provided, contact the registrar customer care group.

If your registrar does not provide explicit instructions - or if you use the domain manager wizard and get either of the above results, it may be time to contact a customer service representative. Using a third party registrar, or a third party DNS hosting service, you may have to improvise.

Forwarding a domain - when you must serve two domains (or more) from one blog - is simply not a task for the inexperienced.

When You Setup A Custom Domain, Please Know And Observe Your Limits Of Expertise

Too many blog owners, when they setup a custom domain for their blog, do not consider the details.

We see signs of the problem, too often, in Blogger Help Forum: Something Is Broken.
Can someone give me step by step instructions for setting up a custom domain with xxxxxxx registrar? I contacted xxxxxxx customer service - and they told me a lot of things I didn't understand! Would it be easier just to transfer the domain to GoDaddy?

The short answer here would be
Yes, it would be easier just to transfer the domain to GoDaddy.
Unfortunately, that answer is not completely correct - and the correction may leave you with a broken domain.

Too many blog owners, eager to setup a non BlogSpot URL for their blog, do not consider the details involved, when they bypass "Buy a domain".

Part of the blame, for this problem, has to fall onto Blogger's head. People using "Buy a domain", for their first domain purchase, see the domain purchase as such a simple process. They never become aware of the complexities involved in a domain purchase, until they setup their second domain, and decide to "roll their own".

Let's look at the levels of experience needed.
  • Beginner: Use "Buy a domain".
  • Intermediate: Use the Google Apps or Google Wallet wizard - or alternately, buy a domain from one of the 8 identified registrars.
  • Advanced: Buy a domain, directly, from any of the thousands of registrars, worldwide.


As of 2013 June, "Buy a domain" is not offered, as part of "Add a custom domain" - although blog owners, in the USA, may use Google Domains. This will leave people outside the USA with one option - "Advanced".
Beginner blog owners are strongly advised to use "Buy a domain". Choose an available domain, provide payment details, and your domain is setup. Wait until Transition expires, and get to work referring your readers, search engines, and other Internet services, to your new, non BlogSpot URL.

Intermediate blog owners, able to understand simple instructions, should be able to use the wizards provided by Google Apps or Google Wallet. Alternately, Blogger provides reasonably complete and simple instructions for setting up a domain with the 8 most popular registrars.

Advanced blog owners are free to choose any registrar, of the thousands out there. But beware! You are on your own, when you do this.
So choose your registrar according to your needs - and according to your skill level. Don't start a custom domain project, before verifying that your experience is complete. Make the right choice, before you sign on the dotted line.

eNom Hosted Custom Domains Again Showing Intermittent Connectivity Issues

This week, we have a few reports in Blogger Help Forum: Something Is Broken, about active and mature domains, suddenly stopped working.
I have used my domain with no problems, since last year. Today, it suddenly stopped working, and the browser reports
Oops! Google Chrome could not find www.mydomain.com.
I asked my friends about my domain - and they tell me that my blog is inaccessible to them, also. I didn't change any settings - and it was fine, until last night.

As we reported last year, the Google partner registrar eNom occasionally has a problem with their DNS server complement. Right now, one of their DNS servers appears consistently bad.

Using a comprehensive Dig tool, we can observe a given domain, and compare the DNS addresses being served by all authoritative name servers for a given domain, in a single transaction.

Here's a hypothetical example, of what we're seeing right now, for several eNom hosted domains.
mycustomdomain.com@dns1.name-services.com.:

mycustomdomain.com. 1800 IN A 216.239.36.21
mycustomdomain.com. 1800 IN A 216.239.34.21
mycustomdomain.com. 1800 IN A 216.239.38.21
mycustomdomain.com. 1800 IN A 216.239.32.21

mycustomdomain.com@dns2.name-services.com.:

mycustomdomain.com. 1800 IN A 216.239.36.21
mycustomdomain.com. 1800 IN A 216.239.34.21
mycustomdomain.com. 1800 IN A 216.239.32.21
mycustomdomain.com. 1800 IN A 216.239.38.21

mycustomdomain.com@dns3.name-services.com.:

mycustomdomain.com. 1800 IN A 216.239.36.21
mycustomdomain.com. 1800 IN A 216.239.32.21
mycustomdomain.com. 1800 IN A 216.239.34.21
mycustomdomain.com. 1800 IN A 216.239.38.21

mycustomdomain.com@dns4.name-services.com.:

mycustomdomain.com. 1800 IN A 216.239.36.21
mycustomdomain.com. 1800 IN A 216.239.34.21
mycustomdomain.com. 1800 IN A 216.239.32.21
mycustomdomain.com. 1800 IN A 216.239.38.21

mycustomdomain.com@dns5.name-services.com.:

org. 3601 IN
SOA dns1.name-services.com. info.name-services.com. 2010 10800 3600 604800 3600


www.mycustomdomain.com@dns1.name-services.com.:

www.mycustomdomain.com. 1800 IN CNAME ghs.google.com.

www.mycustomdomain.com@dns2.name-services.com.:

www.mycustomdomain.com. 1800 IN CNAME ghs.google.com.

www.mycustomdomain.com@dns3.name-services.com.:

www.mycustomdomain.com. 1800 IN CNAME ghs.google.com.

www.mycustomdomain.com@dns4.name-services.com.:

www.mycustomdomain.com. 1800 IN CNAME ghs.google.com.

www.mycustomdomain.com@dns5.name-services.com.:

org. 3601 IN
SOA dns1.name-services.com. info.name-services.com. 2010 10800 3600 604800 3600
Right now, it appears that server "dns5" is consistently broken.

It's possible that this problem will affect more eNom customers, as the day progresses, cached DNS addresses expire, and readers of various eNom hosted domains request DNS addresses. I hope that eNom Customer Service can react to this problem more promptly than they have reacted to the immediately previous problem.

Watch for eNom acknowledged changes and problems.

Google Apps Ends Availability Of Their Free Edition

Last week, Google dropped a bombshell on many small client developers.
Starting on December 6, 2012, Google will no longer offer new accounts for the free edition of Google Apps. Google Apps free edition is sometimes referred to as "Standard Edition."

This announcement will bring changes to Blogger, and to custom domain publishing. Many owners of Blogger blogs published using the Google Custom Domain feature have learned to use various Google Apps wizards, to setup and to maintain their domains.

Blogger blog owners have learned (some unwillingly) to use Google Apps for various tasks.
  1. Access the registrar's Domain Manager wizard, after using "Buy a domain".
  2. Deactivate service redirects, such as the Sites service.
  3. Maintain domain "auto renew" settings.
  4. Reset the ever painful "Another blog ..." symptom of database corruption.
  5. Set the option to "Redirect mydomain.com to www.mydomain.com".
  6. Setup email delivery for the domain.
Each of these tasks will have to be performed in different ways, for blog owners who purchased their domains after last week. Previously setup Apps accounts, for the immediate future, are safe.
If you already have the free edition, you can continue to use it for free. This change has no impact on existing users of the free edition.

So far, we've seen some new domain owners use the Trial version of Google Apps, to recycle domain settings, when dealing with "Another blog ...". We hope that this technique will allow temporary access to the domain root redirect, and to service redirect, settings also. We are also seeing a limited functionality free version, which requires some effort to setup, in some cases.

In January 2015, Google launched Google Domains, a Google owned registrar, currently available in the USA. Google Domains has many features popular in "Buy a domain" and Google Apps based domain purchases, such as email addresses that can be forwarded to GMail and other front end services. Private and secure cloud based file sharing, with Content Management System supported business class documents, is available using Google Drive.

Blog Owners Seeing "Error 14" Or Similar Symptom, When Attempting To Publish To A Custom Domain URL

We're seeing a small but steady flood of reports, in Blogger Help Forum: Something Is Broken, from blog owners attempting to publish their blogs using a custom domain URL.
I am not able to redirect my blog from blogspot to my own domain! Blogger is giving me the error
We have not been able to verify your authority to this domain. Error 14.

This specific problem has been observed numerous times in the past, ever since Blogger added the domain ownership verification process to the custom domain publishing feature. Problem reports require careful diagnosis, involving examination of the basic DNS addresses setup with the registrar, to verify the "Error 14" as the primary problem.

Because careful diagnosis is required, for each case reported, we're not adding a Rollup Discussion in the forum. Instead, we request that each blog owner, observing this problem, post her / his problem report in a topic started for that purpose, by himself / herself only. This will allow us to inventory this problem properly, and assist Blogger Engineering in isolating and fixing this problem promptly, so the blog owners can get on with the after publishing process.

Reports of this problem appear to have started in volume late Saturday, 11/17, Pacific time - though some reports, examined in detail, mention the problem initially observed several days ago. The initial volume of the problem appeared to come from SouthEast Asia - but as additional reports were posted, we see Europe and the Americas apparently represented.

Blogger Engineering is now aware of the problem, and will investigate. We'll continue to monitor the forum topics, and to post an initial advisory FAQ, as a response to the reports observed - when reports contain clear evidence of the "Error 14" being a primary symptom. Please monitor that FAQ, and this post, for any ongoing updates.

>> Top

The Free Domain Registration Service "co.cc" Appears To Be Down

Some Blogger blog owners, trying to save a few dollars while publishing their blogs to a non BlogSpot URL, have used the free service "co.cc" for registering their domains.

As "co.cc" increased its base of "customers", their reputation for providing free registration grew - and they became popular with scammers and spammers.

Last year, Google, weary of the overall poor search engine reputation of co.cc customers, de indexed all websites registered by co.cc. This week, co.cc apparently stopped serving DNS information for its "customer domains".

Strictly speaking, "co.cc" was not a registrar - and the blogs and websites published by its customers were not using registered domains.

"co.cc" was the domain "co", registered by its owner, and providing subdomains.

The "Top Level domain co.cc" - which by its name implied an Internet service operating from the Cocos (Keeling) Islands - was in fact the domain "co", operating out of Korea, and registered in the Cocos (Keeling) Islands. All "domains" given out by "co.cc" were in fact sub domains to the domain co.cc - and this is where the problem started.

All blogs and websites, published to a "co.cc" subdomain, were aggregated by the search engines as the "co.cc" domain. As the number of co.cc registered scammy and spammy websites increased, their search engine reputation dropped.

Non spammy blogs and websites either went out of business, or were transferred to legally registered domains, because of the low reputation and lower search engine originated traffic.

The owners of "co.cc" realised that their scam had been outed, and closed down.

Finally, the owners of co.cc - supposedly "JONG SUNG, KIM" of "GOYANG,GYEOUNGGI" - realised that their run was over, and that they could no longer hide their scams and spams behind legitimate blogs and websites. Apparently, they have now shut their doors.


The old adage comes to mind.
You don't get something for nothing.

If you published to a "co.cc" subdomain, you have to publish back to BlogSpot.

If you registered your custom domain using co.cc - and your blog is now offline - you're going to have to publish the blog back to BlogSpot, to get it online again. If you want to use a domain URL, you have to repeat the custom domain setup process - starting with a new, properly paid for, domain URL.
(Update 2015/02): We now have more of the same, from "co.vu".

A free ".co.cc" "domain", when it was working, was worth precisely what you paid. Now, it's worth less.

Observe DNS Address Entry Conventions

One of the more frustrating steps involved in setting up a custom domain comes with entry of the DNS addresses, into the domain host or registrar's DNS dashboard aka zone editor.

Whether you are setting up a new domain, just purchased directly from a registrar - or re publishing an existing domain, purchased using "Buy a domain" - the addition of the proper DNS addresses is essential to successful custom domain publishing.

Sometimes, you just can't get the zone editor to accept what you are provided by "settings instructions". Other times, you enter the proper values, your update is accepted by the zone editor - and the Blogger Publishing wizard rejects your attempts.

Even after repeated attempts to publish your blog to the domain, you can get another "Another blog ..." error - maybe an "Error 12" or variant.

You may see "Another blog ...", in spite of your efforts.

This may be in spite of the fact that you are retrieving a new "Name" / "Destination" periodically from "settings instructions", and dutifully adding or updating the domain ownership verification "CNAME" Alternately, you may just be adding the base DNS "A" or "CNAME" addresses.

There are syntax conventions, for both "Name" and "Destination".

Every blog owner needs to realise that the zone editors have conventions for entry of both the "Name" ("Label" / "Host"), and the "Destination" ("Target" / "Points To") values in the DNS address records ("Zone Entry"). The conventions used will vary, from zone editor to zone editor - and the differing conventions will affect the success of your domain publishing attempts.

You may see the results of an error immediately, or later.

In some cases, the zone editor will immediately reject your entry, if you mis enter the value. In other cases, the entry will be accepted - but Blogger will reject your attempts to publish. Either scenario can be caused by mis entry of either the "Name" or "Destination" value, and your overlooking the differences between "absolute" vs "relative" addresses.


GoDaddy adds the trailing ".", automatically!


This problem is observed by some as the mysterious "period" / "full stop".

  • If you omit the period, and it is required, the Zone Update may take place - but the Blogger Publishing wizard will overlook or reject the resulting DNS address.
  • If you add the period, and it is not allowed, the zone editor will reject your attempt.

This can happen for either the "Name" or "Destination" value.

The problem cannot be resolved by Blogger / Google.

Here, I will note that this problem is one which neither Blogger nor Google can resolve. Whether you purchased the domain using "Buy a domain" - or directly from the registrar - if you use the DNS dashboard / zone editor wizard provided by the DNS Host / Registrar, your understanding of the conventions observed by the zone editor are your responsibility.

You, the domain owner, must determine the syntax requirements.

There are requirements for entering the "Name" and for entering the "Destination" values - and you have to find out, and adjust to, each requirement.

For some zone editors, with a domain of "mydomain.com", you will probably enter the published address - "www.mydomain.com" - as "www". This says that the "Name" value is "relative" to the domain URL.

You can't enter the domain root, "mydomain.com", as "mydomain.com" - as this would give you a DNS address of "mydomain.com.mydomain.com" - and yet another "Another blog ..." error. You will probably need to enter the domain root as "@" or a similar special character. This, too, is your responsibility to verify.

With other registrars, "mydomain.com" is entered as "mydomain.com". Nobody but the registrar can tell you which case affects your domain.

If you require assistance, be prepared to provide details.

If you are asking for help in Blogger Help Forum: Something Is Broken, and I am advising you, I'll be asking you for three essential values.

  1. The BlogSpot URL.
  2. The domain URL.
  3. The "Name" / "Destination" values provided by the "settings instructions" document, or "Error 12" et al display.

None of these values are optional - and strict attention to accuracy and detail, in your reply, is essential.

If you redact any portion of what you provide, I'll only ask you again, to not redact details. And I'll repeatedly advise you to always copy and paste - never type by eyeballing - both the long and short tokens ("Name" / "Destination") in the "Error 12" et al displays.

Accessing The Registrar's Domain Manager, After Using "Buy a domain"

Setting up a custom domain, and publishing a blog to a non BlogSpot URL, is a simple enough task - when we are able to use the "Buy a domain for your blog" wizard.

Sometimes, after using "Buy a domain ...", we may still have to access the registrar's Domain Manager wizard - maybe to setup additional hosts, or to use the domain with non Blogger services.

When we use "Buy a domain", along with setting up the domain for us, the Blogger / Google wizard sets up a new eNom or GoDaddy domain owner account. To let us later login to eNom or GoDaddy, the "Buy a domain" wizard saves the login information, for our new account - in a Google Apps desktop wizard.

Here is yet one more reason why we absolutely must setup the provided Google Apps account, after receiving the Google Apps email. Be aware of the oddities of the Google One Login wizard, and Google Apps, when logging in.

The process of managing a domain, when setup using "Buy a domain", is not too complicated.
  1. Setup a new Google Apps account. Since free Google Apps accounts are no longer offered, you'll have to setup a Trial - or limited function - account.
  2. Login to Google Apps.
  3. Retrieve the Google Apps registrar login information, from "Advanced DNS settings".
  4. Login to the registrar (eNom or GoDaddy).


With later domains, purchased using "Buy a domain", you may simply have to activate the "bloggeradmin" account, for your domain.

The domain owner registrar login information is right there, in "Advanced DNS settings".


The domain owner login information is in the Google Apps desktop.
  1. Go to "Domain settings" - "Domain names" - "Advanced DNS settings".
  2. Open a new browser tab or window, clicking on "Sign in to DNS console".
  3. Copy the Sign-in name, and the Password, to the appropriate boxes on the sign-in dialogue, and click "Login".
  4. This will put you into the Domain Manager wizard, for the new domain.


If you already had an eNom or GoDaddy account, that will be a separate account - but with this new account maintained for you, by Google.

Just keep your new Google Apps account accessible and active, and keep the domain registration up to date - and you'll have no problem accessing the Domain Manager wizard, and managing the domain, whenever you need. And do not transfer control of your Blogger blogs, to accounts which require Google Apps, without understanding the risks.

Use Third Party DNS Servers, For 1And1 Domains

Not all registrars are able to support the new Blogger domain ownership verification requirement.

Some registrars won't allow a second "CNAME" in the same subdomain - and others can't handle the excessively long target address. Ever since Blogger added domain ownership verification, we've been seeing complaints from some blog owners, who have purchased domains directly from registrars who can't provide the required DNS addresses on their servers.

Even though not all registrars have DNS servers that will provide the right DNS address entries, most registrars will allow us to use third party DNS servers. The use of publicly available DNS servers, which can provide the required DNS addresses, will eliminate the need to transfer domain registration - when the registrar is unable to provide the right DNS addresses, using their own servers.

If you're trying to setup your domain, purchased from 1And1 or a similar registrar, you need only to setup a suitable third party DNS server.

If your registrar limits their services, use a third party DNS host.

Use of a third party DNS host will also help victims of the eNom DNS Infrastructure problem - and those who purchased Name Registration, directly from the registrar.

An explanation of the solution is provided, by Blogger Engineers.

Marc Ridey, of Blogger Engineering, provides How to setup your Blogger blog with a custom domain from 1and1.com, and adds three simple steps to the normal third party registrar domain setup process.

  1. Setup a (free) ClouDNS account.
  2. Setup your normal DNS addresses (plus the domain ownership verification "CNAME", if required) in ClouDNS, using the ClouDNS Domain Manager wizard.
  3. Setup your domain, using your registrar's domain manager wizard, pointing to the ClouDNS DNS servers.

Do each step, one at a time - and check your work.

When you update DNS addresses, such as adding additional hosts, and ownership verification, you use the ClouDNS Domain Manager wizard.

Note the caveat, for advanced domain owners.

If you are using your third party registrar because you have non Blogger services (a web site, email, files, or other service) hosted by the registrar, please note the warning by Marc!
Warning: If you are using 1and1 hosting services to display a website as well as a Blogger blog, these instructions will disable the website. Please post a comment with your website address and I'll check how these instructions must be updated. If you're using eMail, remember to complete the optional eMail step.

Note that ClouDNS, when setup, may offer the option to redirect the domain root (aka "naked domain") to the "www" alias (or whatever DNS address you may setup). For best results, ignore that option, and use the Blogger or Google Apps redirect.

There are still only three acceptable DNS models - use of ClouDNS, or any similar third party DNS host, will not change that.

This may not be a perfect solution - but it will produce a stable domain.

This may not be an ideal solution for the problem - it introduces a bit of complexity into the domain setup process. This will allow owners of newly purchased domains from 1And1, Network Solutions, and others to get their domains verified, and get their blogs online again.

Since this starts with blog owners who elected to purchase their domain directly from a registrar - and setup the domain themselves - maybe it's not too much, technically.

http://blogging.nitecruzr.net/2012/11/use-third-party-dns-servers-for-domains.html Use Third Party DNS Servers, For Domains Registered By 1And1, And Similar Registrars

No Immediate Solution For 1And1 Customers With Unverifiable Custom Domains

Since Blogger restored Custom Domain Publishing last month, with the new domain ownership verification requirement, there have been a few complaints from customers of some registrars who just can't provide the required DNS address record for ownership verification.
My registrar says that I can't have two "CNAME" records in the same subdomain.
and
My registrar's domain manager wizard displays an error saying "Address too long.", when I try to add the "CNAME".
Blog owners contacting the registrar, and asking for help, are generally told
That's Blogger's problem!

(Update 2012/11): Blogger Engineering has provided a workaround for this problem, with any uncooperative registrar, such as 1And1 - use of a (free) third party DNS host.

What not all blog owners realise is that the new "CNAME" must be just that - there is no substitute here.

Some of the more patient blog owners have made various suggestions, to get us moving towards a solution.
  1. Blogger Support needs to work with the problem registrars, and convince them to improve their service.
  2. Blogger Support needs to provide an alternate ownership verification procedure - maybe equivalent to the Google Webmaster Tools meta tag verification procedure.
  3. Blogger Support needs to clean up their "CNAME" setup instructions, and remove mention of the problem registrars - so future blog owners won't choose these registrars to host their domains.


About 3/4 of the problem reports have come from customers of 1And1. Using that registrar as a starting point, I contacted Blogger Support and suggested the 3 alternatives, outlined above. The Blogger Engineer responding seemed to think that only suggestion #3 - cleanup of the per registrar "CNAME" addition instructions was immediately possible.

It's possible, then, that we will eventually see less problem reports from 1And1 customers - and hopefully others - as Blogger Engineering cleans up their domain setup instructions. The current customers of uncooperative registrars, unfortunately, are unlikely to see relief, for the near future.

This is an unfortunate situation for these 1And1 customers. The best solution for them is to move domain registration to another, more helpful, registrar. Unfortunately, most registrars don't allow domain registration transfers immediately after initial purchase - waiting periods of 30, or even 60 - days are normal. And domain registration fees are not refunded.

This leaves new 1And1 customers, and similar victims, with several options - none of them good. First, publish the blog back to BlogSpot, so the blog can be accessed by existing readers.
  • Wait 30 - 60 days, with the domain dead, then transfer domain registration to a more helpful registrar and activate.
  • Purchase a second domain, from a more helpful registrar.
  • Forget about custom domain publishing.
The latter alternative has motivated several victims to choose a fourth alternative.
  • Move their blog hosting to a different service.
None of this can be good for Blogger's reputation.

>> Top

Contact Us

24x7 online , we happy to answer you
tamilcypc@gmail.com

Disclaimer

This Blog and its TUT's are intended for educational purposes only, no-one involved in the creation of this TuT may be held responsible for any illegal acts brought about by this Blog or TuT.


Featured Post

Custom Domains And HTTPS Redirection Code