Latest News

Showing posts with label windows. Show all posts

How to Stop Sharing in Windows 7

If it's not necessary for you to share folders on your machine with other users, turn off file sharing.You can stop sharing a folder at any time. However, any data downloaded by folder members remains on those computers. Files in the shared folder are not deleted from any location (your computer or folder members' computers).

1. Right Click on Computer and Click on Manage
(Click on image for large view)

2. Click on Share Folders then Click on Shares

3. Right Click on Admin then Click on Stop Sharing

4. Click on Yes

5. Click on Yes
(Click on image for large view)

Like it ? Share it.

Folder Option is Missing in Windows Vista/ Windows 7


The Folder Options dialog box lets users set many properties of Windows Explorer, such as Active Desktop, Web view, Offline Files, hidden system files, and file type. Folder option" is most usable thing in Windows System. You can do a lot by using Folder option like hide/show files etc.

Error Details : This operation has been cancelled due to restrictions in effect on this computer. Please contact your system Adminstrator.
(Click image for large view)

You must be signed in as and administrator to be able to do the steps in this tutorial.
1. Press Windows + R and type gpedit.msc then click on OK

2. A windows will appear. This is Local Group Policy. Now go to 
User Configuration → Administrative Templates → Windows Components → Windows Explorer. Now carefully watch the list there you will see "Remove the Folder Options menu item from the Tools menu " Right Click on this and click on Edit

3. Now select Disabled and Click OK
(Click image for large view)

4. Restart System.

Note - This tutorial is also useful if you want to Enable/Disable your folder option for some reason. Above method tells you how can you Enable Folder Option. If you want to Disable Folder Option. you just need to choose Enabled option from Image no 3 
In short :

To Enable Folder Options
Select Disabled or Not Configured and click on OK. (Image No 3)
NOTE: Not Configured is the default setting.

To Disable Folder Options
Select Enabled and click on OK. (Image No 3 but you just need to choose Enabled)

Reset Group Policy in Vista/ Windows 7/ 8


Local Group Policy Editor, an administrator can edit local GPOs, disable computer or user settings in Local Group Policy and use scripts for certain tasks that include startup and shutdown. Local Group Policy Editor can be found in all Windows Server versions since Windows Server 2008. Local Group Policy Editor is not available on Windows home editions.
This method can save you from headache of group policies error. I am sure that it will also helpful for those who are facing some problems like folder option error etc...The Local Group Policy Editor has now been reset back to default.

1. Open  command prompt with Administrator rights otherwise you will face problem "Access Denied" Vista or Windows 7 or Windows 8.
(Click image for large view)

2. In the command prompt, type diskpart, and press Enter

3. In the command prompt, type list volume, and press Enter. You will see your volume list (Partition list). Make a note your Local Drive Letter. For Example here mine is C Drive.

4. In the command prompt, type exit, and press Enter.

5. In the command prompt, type RD /S /Q "C:\Windows\System32\GroupPolicy" and press Enter. Here C is my local drive letter.

6. Again type RD /S /Q "C:\Windows\System32\GroupPolicyUsers" and Press Enter.
(Click image for large view)

7. Restart the computer.

Like it ? Share it.

How to Connect Nokia BH-503 Headset to PC/Laptop

The Nokia BH-503 has Bluetooth 2.0 + EDR and it supports both Headset and Handsfree profiles for phone calls, and A2DP and AVRCP for music playback.
The Nokia BH-503 has very good audio quality for both phone calls and music playback. One might not suspect it, but it’s actually not easy to find stereo Bluetooth headsets that have great in-call voice quality, but the Nokia BH503 surprised us with excellent in-call voice and very loud volume.
Battery life is superb on the Nokia especially if you listen to music on and off instead of continuously. The headset comes with rechargeable battery and you can charge it with the included charger.
The claimed talk time and music playback time is 11 hours and the claimed standby time is over 8 days. The Nokia BH-503 is a joy to use for both phone calls and music playback.

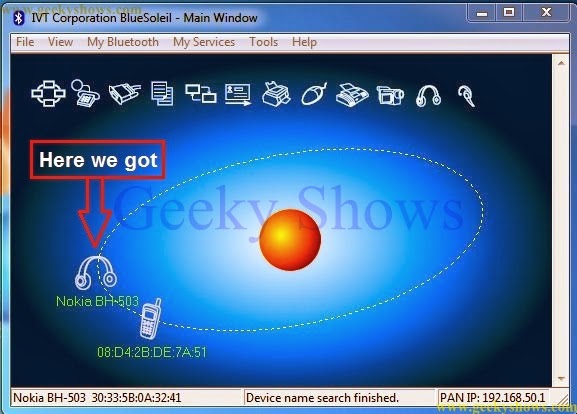
1. First of all download a software : IVT BlueSoleil 2.6.0.8 070517 
    How to Download 
       A. Don't be lazy Search on google you will find it.
or
       B. Mail me at mrquiety@geekyshows.com and within 24 hours i will reply you a download link at your email ID. 
or
       C. Download Link ( Coming Soon)

2. After downloading Extract it and Install this software on your PC or Laptop.
(Click on image for large view)

3. Check Device Manager and be sure your driver has been successfully installed.

4. Restart Your PC/Laptop. Do not unplug your Bluetooth.

5. Now Open BlueSoleil 

6. Soon you will notice a notification at right hand side "Bluetooth Started" as well bluetooth tray icon color will be change into blue. If not then unplug your bluetooth and plug it again or may be you need to restart one more time depends on your luck. 

7. Long Press Call button in your Nokia BH-503 and hold it till three color - Red, Green and Blue blinking. 

8. Finally a blue color will be blink then leave it 

9. Now come to your BlueSoleil and Click on Refresh Devices. 

10. Soon you will find your device name below on the list.

11. Right Click on your Device name and Click on Refresh Services

12. You will notice at the top there are two option high-lighted for Headset.

13. Right Click on Headset Icon then Click on Connect.

14. It will ask you Passkey for pairing the device. Simply write 0000 and click on OK.

15. So you have paired with your device successfully. 

16. Now Enjoy the Music with your Nokia BH-503
17. If you want to disconnect your device then right click on headset icon then click on Disconnect.
(Click on image for large view)

Like it ? Share it.

How to Open Paypal account in India

What is Paypal?
PayPal is the faster, safer way to pay and get paid online, via a mobile device and in store. The service gives people simpler ways to send money without sharing financial information, and with the flexibility to pay using their account balances, bank accounts, credit cards or promotional financing. With 143 million active accounts in 193 markets and 26 currencies around the world, PayPal enables global commerce, processing more than 9 million payments every day. Because PayPal helps people transact anytime, anywhere and in any way, the company is a driving force behind the growth of mobile commerce and processed $27 billion in mobile payments in 2013. PayPal is an eBay (Nasdaq:EBAY) company and contributed 41 percent of eBay Inc.'s revenues in 2013. PayPal is headquartered in San Jose, Calif. and its international headquarters is located in Singapore.

As of March 2011, PayPal made changes to the User Agreement for Indian users to comply with Reserve Bank of India regulations. Notable changes to the agreement were:
  • Any balance or future payments must not be used to buy goods or services but transferred to a bank account. The PayPal balance is automatically withdrawn to the bank account.
  • PayPal balance cannot be used to make purchases. Credit/Debit cards linked with the PayPal account must be used to pay through PayPal.
The per transaction limit had been set to USD 3000, since October 14, 2011. However, on July 29, 2013 PayPal has increased the per transaction limit to USD 10,000. This brings the per transaction limit for India in line with the restrictions imposed by PayPal on most other countries.
PayPal has disabled sending and receiving personal payments in India, thus forcing all recipients to pay a transaction fee.
PayPal wants to make India an incubation center for the company's employee engagement policies. In 2012, PayPal hired 120 people for its offices in Chennai and Bangalore. PayPal plans to recruit 1000 candidates for its Bangalore Development center.

What You need for Creating a Paypal Account:
  • PAN Card 
  • An Active Email ID
  • Bank Details with IFSC Code 
Where I can get my Bank IFSC Code ?
Is there any charge for creating paypal account?
NO, Its Free of cost.

How to setup a Paypal Account :
1. Go to Paypal official site www.paypal.com and Click on Sign UP
(Click on image for large view)

2. Select Your Country and Click on Get Started Under the An account for Individuals.

3. Now fill the form completely. Details should be according to your Pan card and Bank details. This is will you to verify your Paypal account in the future. After filling the form Click on Agree and Create Account.

4. In this screen fill the Code as shown and click on Continue.

5. In this screen you do not need to fill up your credit/debit card details. Simply click on Go to My account

6. In this step Click on Add Bank

7. Fill up this form according to your bank details and click on Continue

8. Now Click on Purpose Code link. You will see this screen here Select Advertising and market research and click on Save
(Click on image for large view)

9. Its Done for Now but after some days you will receive two small amounts in your bank account. It takes around 7 days maximum. So, Whenever your account will be credit with those amount come to your paypal account and fill those amounts in the specific field. If everything is OK your account will be verify.


Like it ? Share it.

Hack Windows Admin Password Using Win7 Usb/DVD

Many people forgot their Windows 7 password as well Many people want to get access to other's Admin account. In both cases I am going to show you a solution or In Geeky Shows words I am going to show you How to Hack Windows 7 Admin Password.
Many people still don't know that we can easily reset our forgotten windows 7 password so they just format their PC and loose lots of data. I am sure this article going to help those peoples a lot and the credit goes to our dear Author Mr d00z13.

1. First of all Open BIOS on your system and Set DVD/USB as your 1st boot order.
(Click on image for large view)

2. Insert DVD/USB and Boot your computer with it.

3. Wait for the windows to load files

4. Click Next

5. Click on Repair Your Computer

6. Select Windows 7 and Click Next

7. Click on Command Prompt

8. Soon Command Prompt will be open. You need to write syntax: copy c:\windows\system32\sethc.exe c:\ and Press Enter, You will get a message '1 file(s) copied.

9. After that Type copy c:\windows\system32\cmd.exe c:\windows\system32\sethc.exe and Press Enter. It will ask for overwrite type YES and Press Enter.

10. You have almost done most of the work, close the command prompt and Click Restart

11. Now Boot Normally. It will good if you will remove/Eject your Bootable Pendrive or DVD otherwise it will again bring you to windows 7 installation area.

12. When Log in Screen appears, Press SHIFT Key 5 Times quickly. It will open Command Prompt.

13. Now Write Syntax: net user username newpassword and Press Enter
Note: Remember Replace Username with your own Username as well replace new password with your own password

14. You have done. Close the command prompt and LOG IN with New Password.
(Click on image for large view)
Author: Mr d00z13

Like it ? Share it.

Contact Us

24x7 online , we happy to answer you
tamilcypc@gmail.com

Disclaimer

This Blog and its TUT's are intended for educational purposes only, no-one involved in the creation of this TuT may be held responsible for any illegal acts brought about by this Blog or TuT.


Featured Post

Custom Domains And HTTPS Redirection Code