Latest News

Showing posts with label Custom Domains Setup. Show all posts

Troubleshooting Your Custom Domain Problems

Of the many accessories and features in Blogger, Custom Domain Publishing is possibly the most problematic.

Looking at the Labels index in this blog, I see the Custom Domains label on 363 posts (as of 2015/06/15) - which makes it one of the most heavily labeled single topics here. There are several challenges with diagnosing and resolving a custom domain problem.
  • It has various different causes.
  • It leads to many different symptoms, which can easily be confused for other problems.
  • Its symptoms can be chronic or intermittent- and may be immediate, or may take months to exhibit themselves.
  • It may require resolution by any blog guest, by the blog owner, by Blogger Support, and / or by a third party such as the domain registrar.


As you read this article, click on some of the many links in the text, and read the linked articles.

Please think of this article as the first chapter in a very large book - right now, a book with 363 chapters.


How To Use This Guide

These are the known custom domain publishing diagnoses. Here's a brief, one line summary of the problems, which are discussed, in some detail, farther below. Click on any one, if it looks promising, to jump to the detail discussion.


Domain Purchase Unsuccessful
  • The domain will not be setup. The blog may, or may not, be published to the domain.
  • This will follow use of "Buy a domain".
  • The primary symptoms will vary. We see both "404 Not Found", and "Another blog is already hosted at this address", fairly common for this problem.
  • This will be an issue for newly purchased domains.
  • It will be diagnosed by use of the WhoIs log showing "xxxxxxx.xxx appears to be available", and verified by examination of the Google Checkout logs, and bank account ledger entries.
  • The blog owner generally has to correct a problem with his bank account, then repeat the purchase of the domain.


Only Name Registration Purchased, No DNS Hosting
  • The domain will not be setup, nor the blog published to the domain.
  • This will follow domain registration, purchased from a third party registrar.
  • The primary symptom will be the query "What are the DNS servers for Google?", "I need 2 IP addresses for my domain!", or "I can only change NameServer1, NameServer2 in my domain setup!".
  • This will be an issue for newly purchased domains.
  • It will be diagnosed by the stated symptom, with the blogger confirming the diagnosis by checking the registrar's invoice to see what services were paid for.
  • The blogger will have to arrange for DNS hosting - free or paid - but choose the right DNS hosting service. A free third party DNS hosting service may be useful, in this case.


Domain Addresses Not Defined
  • The blog will not be successfully published to the domain.
  • This will follow domain registration using "Buy a domain".
  • The primary symptom will be "Another blog is already hosted at this address", in the Settings - Basic - Publishing display.
  • This will occur for new custom domains.
  • It will be diagnosed using an excerpted Dig log, for both domain URLs.
  • Here, the blogger will be advised to contact Google Apps Support, for any domain purchase issues.


Domain Ownership Not Verified


Non Google DNS server Part Of Configuration


Domain Addresses Not Properly Chosen


Domain Previously Registered, And Used In Blogger
  • A Blogger blog was successfully published to the domain, at one time - by a different person. It is now not successfully published.
  • This may follow domain registration, purchased from a third party registrar, or using "Buy a domain".
  • The primary symptom will be "Another blog ...", when attempting to publish / re publish the blog to the domain.
  • It will be diagnosed using an excerpted Dig log, for the BlogSpot, and both domain, URLs.
  • It will be resolved using the Custom Domain Reset form - and much patience by the current domain owner.


Domain Registration Expired


Blog Published To Domain, Using Mixed Case URL
  • The blog will be successfully published to the domain, but will not be visible from either BlogSpot or domain URLs.
  • This may follow domain registration, purchased from a third party registrar, or using "Buy a domain".
  • The primary symptom will be a "404 Not Found", when attempting to view the blog using either the BlogSpot or domain URLs.
  • This will, typically, occur for new custom domains, immediately after the end of the 3 Day Transition Period.
  • It will be diagnosed using a RexSwain HTTP Trace set, starting from the BlogSpot URL.
  • It is typically resolved by publishing the blog back to BlogSpot, then re publishing to the correct URL, using all lower case letters.


Blog Published To Domain Root, But Asymmetrical DNS Used
  • The blog will not be successfully published to the domain.
  • This may follow domain registration, purchased from a third party registrar, or using "Buy a domain" - though "Buy a domain" will be far more commonly seen.
  • The primary symptom will be a "404 Not Found", when attempting to view the blog using either the BlogSpot or domain URLs - or the warning "Blogs may not be hosted at naked domains." or "Another blog or Google Site is already using this address.", when trying to publish or re publish the blog to the domain.
  • This will, typically, occur for new custom domains.
  • It will be diagnosed using a RexSwain HTTP Trace set, starting from the BlogSpot URL, and confirmed with a screen print of the Publishing wizard display, taken as the blog owner sees the error message in question.
  • It is typically resolved by publishing to the "www" alias.


Domain Redirected To Google Ad Services, Sites, or Start Page URL


Blog Published Partially, To The Custom Domain URL


Internal Blogger Database Corruption


The Blog And Domain Are In Transition
  • The domain will be setup - but will not redirect. The blog will be published to the domain URL.
  • This will follow use of "Buy a domain".
  • The primary symptom will be seen only by the owner (when properly logged in to Blogger). When clicking on the "View Blog" dashboard button / link, the owner will see an "In Transition" display.
  • This will be a temporary issue, for newly purchased domains, successful purchased.
  • It will be diagnosed using an excerpted Dig log, for the BlogSpot, and both domain, URLs.
  • It will go away, when Transition expires, 72 to 96 hours after successful domain purchase and registration. The blog, and the domain, will then redirect properly.
  • While you wait for Transition to expire, spend time reading what you will want to do, when Transition is complete.


All Issues May Not Be Yet Discussed Here
You could, occasionally, have a problem which is not diagnosed in this Guide - and in that case, please ask for help, politely, in Blogger Help Forum: Something Is Broken.

Before asking for help, you can help the helpers if you have tried some affinity diagnostics or maybe some differential diagnostics - and if you are aware that not all problems may be exclusively caused by Blogger. And have some idea how many possibilities exist, for problems.

And if it's not too late, read Blogger Magic - How To Setup A Custom Domain, and Setting Up DNS Addresses For Custom Domains, before you start.

The Mysterious "Destination" / "Points To" Label

Some blog owners buy domains, for publishing a Blogger blog, and ask about how to address the domain.
What address do I use for "Points to"?
Other owners may ask a similar question, referencing "Destination" or maybe "Target".

There is no real difference, between all 3 labels. "Destination", "Target", and "Points to" all refer to the same DNS address value.

To compound the confusion, 4 different addresses are required, when addressing a Blogger custom domain root.

Defining the DNS servers used by the domain root ("naked domain") requires 4 address records - and the labels used, in the zone editor, will vary from registrar to registrar.

We know of 3 different labels, used by Blogger custom domain instructions.

The referential Blogger document How do I use a custom domain name for my blog? uses 3 labels to identify the 4 name servers, which are provided by Google. Blogger uses the triplet label "Destination, Target, or Points to" as their example.

Google provides 4 name servers, to give us multiple redundancy.

Google provides four mutually redundant individual servers, each responding to a specific IP address - for custom domain clients to address the domain root, in a round robin sequence.

There are 4 name servers provided by Blogger, to address a custom domain root.


Each domain root name server entry uses 2 important label values ("Name, Label, or Host" - and "Destination, Target, or Points to").

Each label may have 1 of 3 values, depending upon the zone editor provided by the registrar.

Here is the Dig Log, for the domain root. Look at the 2, 4, 6, and 8, in the 4 address entries.

mydomain.com. 3600 IN A 216.239.32.21
mydomain.com. 3600 IN A 216.239.34.21
mydomain.com. 3600 IN A 216.239.36.21
mydomain.com. 3600 IN A 216.239.38.21

In the GoDaddy zone editor, you'll see these entries depicted as

  Host   Points to           TTL
  @      216.239.32.21    1 Hour
  @      216.239.34.21    1 Hour
  @      216.239.36.21    1 Hour
  @      216.239.38.21    1 Hour

The GoDaddy zone editor uses the labels "Host" and "Points to".

Similar labels ("Name", "Label" and "Destination", "Target") are used by various other registrars, in their own zone editor.

A Zone Editor display, showing the base DNS addresses, for GoDaddy.

Here is the display, used by GoDaddy, for "nitecruzr.co.uk".


Here is the zone editor display, as provided by GoDaddy.

Do you see the 4 address records, beneath "Points to"?


The labels in the address records differ, from registrar to registrar. The "Name, Label, or Host" address values (here, shown as "@") will differ, from registrar to registrar - but the "Destination, Target, or Points to" address values will not differ. A properly addressed domain will have the same 4 "Destination, Target, or Points to" address values, as every other properly addressed domain.

mydomain.com. 3600 IN A 216.239.3n.21

Each address will have one of four values for n: 2, 4, 6, or 8.

Complementing "Destination, Target, or Points to", we have another label set.

Complementing the 3 "Destination, Target, or Points to" label address values, for addressing the 4 name servers provided by Google, we have a similar set of 3 "Name, Label, or Host" label address values.

Addressing "Name, Label, or Host" is somewhat simpler - as all 4 entries are identical to each other, for any domain root address entry.

The Blogger instructions, like the GoDaddy zone editor, use "@", when addressing the domain root. The zone editor value used, however, may differ from registrar to registrar.

Any blog owner, wishing to have a working custom domain, needs to understand how to setup a domain for the registrar involved.

The end result.

Both the "Name, Label, or Host" - and the "Destination, Target, or Points to" - label triplets are only examples. Other unidentified registrars may use other labels.

Considering the Blogger instructions, and the terminology required, Blogger Help Forum: Get Help with an Issue will not soon run out of blog owners, requesting assistance for making their custom domains work.


Some #Blogger blog owners, in the process of setting up their blogs using custom domain publishing, find that labels "Name", "Label", or "Host" - and "Destination", "Points to", or "Target" - are only examples, in the Blogger Help document.

There is no attempt at standardisation, used by the thousands of different Internet registrars, in their dashboards (aka "zone editors").


https://productforums.google.com/forum/#!category-topic/blogger/kMDo0O1xtDM

Custom Domain Setup, And The Blogger Instructions

Custom domain setups continue to confuse blog owners - and lead sometimes to frustration, expressed in Blogger Help Forum: Get Help with an Issue.
When I am trying to set up a custom domain for my new blog, I'm not getting the 2nd CNAME Record, but the settings get saved.
In some cases, the domain may be operational - and other times, the domain will be broken, and no corrective instruction is provided.

The details in the instructions, Blogger Help: How do I use a custom domain name for my blog?, are misleading - and have resulted in broken domains.

The Blogger instructions are confusing.


5. Go to your domain registrar's website and locate the DNS (Domain Name System) settings in the control panel.

Not a lot of details, there.


10. Before you move onto the final step, wait about an hour for your DNS settings to activate. If you attempt the final step before your settings are activated, we'll let you know with a warning message.

All registrars don't use "3600" second TTL.


That's 2 examples of possible problems.

Publishing a blog to a custom domain is so much easier - and produces more reliable results - if you follow basic principles.

  • Learn to use your registrar's zone editor.
  • Learn to read a Dig log.
  • Setup the DNS addresses, for your domain.
  • If necessary, add domain ownership verification.

Learn to use your registrar's zone editor.

The registrar dashboard / zone editor is the portion of the registrar's website, that is created to let you, the domain owner, setup your own domain.

The zone editor is unique, for every different registrar - just as every website is different. One of the signs of uniqueness is hinted, by Blogger.

Each CNAME is composed of two parts - Name, Label or Host and Destination, Target or Points to.

These two (only two) terms here refer to the most essential details, in the zone editor, that make your domain operational. The two details have no consistent names - so we use examples.

The first CNAME is the same for everyone, Name being "www" and Destination "ghs.google.com."

That one sentence is the most essential, for all domains. It looks so simple - but it's so easy to get it wrong. Not every blog owner will see "Name" and "Destination" in the zone editor display. This leads to many imaginative - and wrong - alternatives.

Each registrar labels their zone editor, as they see fit. I've seen other terms used, in addition to the 6 implied. Both "Name, Label or Host" and "Destination, Target or Points to" are merely three examples, for each of these two essential elements.

These details are only hinted, by the Blogger instructions.

  1. Go to your domain registrar's website and locate the DNS (Domain Name System) settings in the control panel.
  2. Now it's time to enter the CNAMEs. Where it says Name, Label or Host simply enter "www" and list ghs.google.com as the Destination, Target or Points to.

Learning how to look, in the zone editor, is much more reliable than being told what to look for.

Learn to read a Dig log.

Compared to the confusion behind the registrar's zone editor, a Dig log is simplicity.

There are three basic DNS configurations, which produce a reliable domain for publishing a Blogger blog. 99.99% of all blog owners will use only one of the three.

ourdomain.com. 3600 IN A 216.239.32.21
ourdomain.com. 3600 IN A 216.239.34.21
ourdomain.com. 3600 IN A 216.239.36.21
ourdomain.com. 3600 IN A 216.239.38.21
www.ourdomain.com. 3600 IN CNAME ghs.google.com.

This is the asymmetrical DNS address configuration. Excepting one known variation, the asymmetrical configuration - with no options - is most reliable.

Setup the DNS addresses, for your domain.

As long as you have access to the zone editor, and understand the above issues - "Learn to use your registrar's zone editor" and "Learn to read a Dig log" - the rest will fall into place.

Unfortunately, not everybody has zone editor access. Similar to Blogger dashboard access, registrar dashboard access is not always a done deal.

Even having zone editor access, the Blogger instructions can mislead.

  1. Optional: You can also enter A-records, which links your naked domain (example.com) to an actual site (www.example.com). If you skip this step, visitors who leave off the "www" will see an error page.
  2. Optional continued: After completing Step 8, enter your domain name in the format example.com, and list the I.P. addresses shown below in the "A" section. You'll need to create four separate A-records which point to four different Google IPs.

Many problems, reported in the forums, indicate that using the domain root properly is (should be indicated as) a necessity.


Once again, the domain root, configured properly, should not be suggested as an option.

  1. Before you move onto the final step, wait about an hour for your DNS settings to activate. If you attempt the final step before your settings are activated, we'll let you know with a warning message.

All registrars don't use one hour TTL.

Be careful of the TTL setting. Unless you know better, stick with the registrar's TTL setting - and try to understand the effects of TTL latency.

If necessary, add domain ownership verification.

Returning to the Blogger instructions, we see

The second CNAME is particular to your blog and your Google Account, and is therefore different for each person.

Not every blog owner will see the second CNAME - whether or not the domain is properly setup.

The Blogger dashboard Publishing wizard only displays the "Error 12", and the second CNAME, under specific conditions. In some cases, the blog will be published to the domain - and the second CNAME will not be provided.

You may not see the instructions for the second "CNAME", until your base addresses are right. If you need the second "CNAME", the "Error 12" display will provide details - when the base addresses redirect properly. If the blog publishes, a second "CNAME" is not necessary.

That is my suggestion. Get the addresses right, before you start - then publish to the domain URL.

If the blog publishes to the domain, and the addresses are wrong, the domain will be broken - or unreliable.

The bottom line.

It's good to have instructions, they suggest the need for proper domain setup technique. Just don't be surprised if following them blindly gives you a broken domain - and an offline blog.

If you are lucky, the blog will appear offline immediately after using the Publishing wizard - and you will know that there is a problem to be fixed. Other times, you (or some readers) might not realise a problem until months or years later.

In the latter case, we'll see you, one day, in Blogger Help Forum: Get Help with an Issue.
I published my blog to my private domain, last month - and the blog pageviews have been in the crapper, ever since!


The instructions supplied by #Blogger, for setting up a custom domain published blog, can be misleading. Blindly observed, they can lead to an immediately offline blog - or to a blog that is online for some, and intermittently offline for others.

https://productforums.google.com/forum/#!category-topic/blogger/Jv0fT5cws3U

The DNS TTL Setting Is Chosen By The Registrar

Some blog owners, publishing their blog to a custom domain, wonder about the mysterious TTL setting for the domain.
What is "3600"? Why do I see "7200" in my Dig log?
and
Why do I have to wait 8 hours, after changing my DNS addresses?
DNS latency (aka "TTL") is not understood, by many blog owners. A mistake in setting TTL can cause anger and frustration.

"Time To Live" aka "TTL" is a registrar individual setting, that is used for providing proper performance from the registrars name servers and network.

TTL controls caching of the DNS addresses, used to access your domain.

TTL indicates how long a DNS address will remain in cache, on a computer, before that computer requests an updated value. It's an essential (but obscure) component, in setting up a custom domain.

Since you're reading this blog, your computer has the address of this blog in cache - and won't be requesting an update, until "TTL" for "blogging.nitecruzr.net" expires. GoDaddy, the registrar for "nitecruzr.net", uses "3600" seconds, or 1 hour TTL.

Your computer probably uses the nameservers provided by your ISP - and your ISPs nameservers get updates from the nameservers provided by GoDaddy. Changes to "nitecruzr.net" go from Google, to GoDaddy, to your ISP, to your computer - and TTL applies to each DNS cache.

A typical Dig log, for a domain with a low TTL value.

Look at a Dig log extract, for "nitecruzr.net".

http://www.digwebinterface.com/?hostnames=nitecruzr.net%0D%0Ablogging.nitecruzr.net&type=A&useresolver=8.8.4.4&ns=auth&nameservers=

nitecruzr.net. 3600 IN A 216.239.32.21
nitecruzr.net. 3600 IN A 216.239.34.21
nitecruzr.net. 3600 IN A 216.239.36.21
nitecruzr.net. 3600 IN A 216.239.38.21
blogging.nitecruzr.net. 3600 IN CNAME ghs.google.com.

You set the TTL, for each individual DNS address, when you setup your domain. The registrar provides a recommended TTL - but most registrars let you select a different setting, within a given range.

A lower TTL ("600" seconds or 10 minutes) provides faster refresh after a change is made - but puts more load on the registrars name servers, and requires a more responsive network.

A higher TTL ("7200" or 2 hours) provides slower refresh - and puts less load on the registrars name servers. And when a change is made, by Google, a higher TTL can cause problems.

If you don't understand DNS, you will be better off not changing from the registrar recommended setting. Some registrars won't even have a TTL setting, in their zone editor - and others may hide it, behind an "Advanced" menu or similar.

If you generate a Dig log for your domain, you'll see the TTL settings for your addresses.

A typical Dig log, for a domain with a high TTL value.

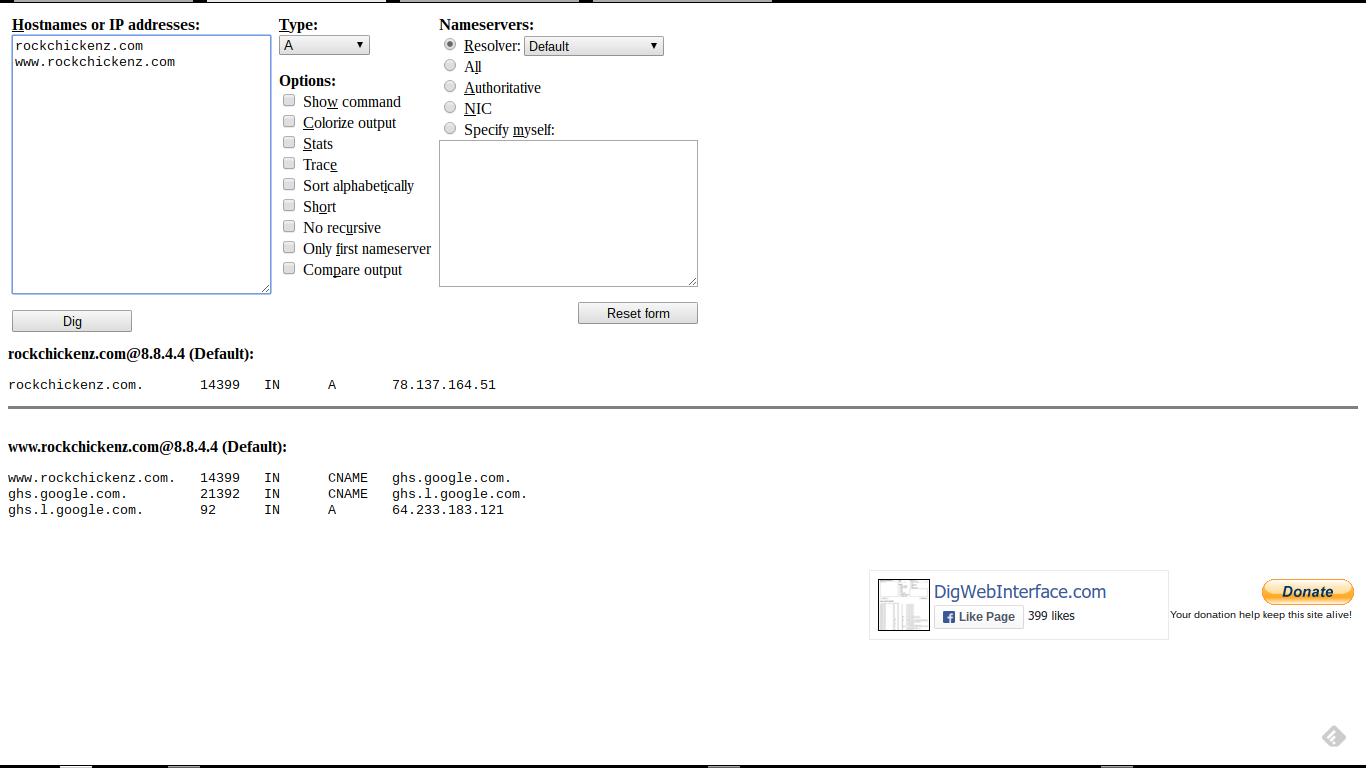
Look at a Dig log, for "rockchickenz.com".


Here, the current DNS addresses (correction pending).


Here, we see a TTL of "14400" (displayed as "14399") - or 4 hours.


rockchickenz.com. 14399 IN A 78.137.164.51
www.rockchickenz.com. 14399 IN CNAME ghs.google.com.

For best results, we suggest that you wait 2 x TTL, after making DNS changes.

I recommend waiting 2 x "TTL", after making any DNS changes, before acting from those changes. Having diagnosed the painful "Another blog ..." domain database corruption, too many times, I suggest this whenever possible.

After you correct the addresses, please wait 8 full hours (2 x "14400" seconds) before continuing. This will let all DNS servers on the Internet receive the corrected addresses.

In many cases, TTL will be "3600" or "1 hour" - and with a typical forum diagnostic session taking several hours between posts, a one or two hour TTL is transparent to the forum discussion.

With domains using 4 hour TTL, suggesting that the blog owner wait 8 full hours after making the change, before re publishing the blog to the domain, makes sense. And a 2 full days, for "86400" seconds, makes even more sense.

And getting a righteous DNS address complement verified - before re publishing - makes the most sense.


DNS TTL latency, which affects accessibility of every #Blogger custom domain published blog, is not understood by many blog owners. To provide a stable domain - and a more visible blog after it's published to a custom domain - every blog owner should understand this obscure detail.

Blogger Magic - Reading A Dig Log

Whether you're setting up or troubleshooting a custom domain, knowing how to read a Dig log is a useful skill.

There are hundreds of registrars, serving the Internet community, each with their own dashboard. Blog owners, setting up their domains for their Blogger blogs, must deal with the syntax and terminology used by each different dashboard.

A Dig log lets the blog owner identify the DNS addresses for the domain, using a consistent display.

By identifying the DNS addresses used in a given domain, a blog owner or an experienced forum helper can diagnose many custom domain DNS related problems.

Here is an example of Dig log use, showing an excerpted Dig log, in a typical forum topic. For more detail, see my earlier post, Diagnosing Problems With Custom Domains: Dig.

I have a domain (www.rockchickenz.com) - and want to link my blog (rockchickenz.blogspot.com).

  • Start by verifying URLs involved.
  • Continue with Dig Web Interface.
  • A full screen print of the Dig log.
  • The relevant portion of the Dig log, from the screen print.
  • The relevant portion of the Dig log, as text.
  • The advice provided, to the blog owner.
  • Alternate / complementary tools used.

Start by verifying URLs involved.

Whenever possible, make a screen print, and a text copy, of the Blogger dashboard Publishing wizard, at Settings - Basic. Knowing the status of the blog and domain - and the exact URLs involved - can go a long way to diagnosing many custom domain publishing problems.

Continue with a Dig Web Interface log.

The best tool for generating a Dig log is Dig Web Interface. Alternate / complementary tools are listed below.

I use DWI, for this purpose, by preference. DWI lets you:

  • Package the URLs in the Dig target, in the reference URL.
  • Include multiple target URLs, in one reference URL.
  • Both capabilities are very useful, in diagnosing Blogger custom domain publishing problems.


Start from the Dig Web Interface page.


Add the domain root and "www" alias, under "Hostnames or IP addresses:".

I select Type: "A", and Nameservers: "Authoritative", for my actual diagnoses.

Click "Dig".


The Dig Log reference URL, for "rockchickenz.com", generated from DWI. Target URLs are "rockchickenz.com" and "www.rockchickenz.com".

http://www.digwebinterface.com/?hostnames=rockchickenz.com%0D%0Awww.rockchickenz.com&type=A&ns=resolver&useresolver=8.8.4.4&nameservers=

A full screen print of the Dig log.

This is the complete Dig log, resulting from the Dig Log URL (above), and containing the relevant portion (below).


This is the Dig log, for "rockchickenz.com".


The relevant portion of the Dig log, from the screen print.

This is the important portion of the screen print (above), and showing the text (below).


This is the relevant portion of the Dig log, for "rockchickenz.com".


Note the TTL value of "14399" - which is a typical Dig log display for TTL set as "14400" (14400 seconds or 4 hours), in the registrar's zone editor. TTL is a setting which is used to adjust name server performance.

Unless you are experienced with DNS setup (and probably don't need to read this advice), you should use the default TTL provided by the registrar, for your domain. Your registrar wants to provide a stable domain for you - and the TTL value affects domain stability.

The relevant portion of the Dig log, as text.

These are the important details from the screen print (above), with colour highlights corresponding to domain specific details (below).

rockchickenz.com@8.8.4.4 (Default):
rockchickenz.com. 14399 IN A 78.137.164.51

www.rockchickenz.com@8.8.4.4 (Default):
www.rockchickenz.com. 14399 IN CNAME ghs.google.com.
ghs.google.com. 21392 IN CNAME ghs.l.google.com.
ghs.l.google.com. 92 IN A 64.233.183.121

The latter is typically seen, with a blog owner having received bogus advice - and reporting an inconsistently accessible blog.

The advice provided, to the blog owner.

The typical advice, provided to the blog owner, would include domain specific details - accompanied by a link to Setting Up DNS Addresses For Custom Domains.

First, generic advice:

Remove the addresses highlighted in red - and add the addresses highlighted in green - and keep the addresses highlighted in yellow.

Then, specific advice:

This is what you have:

rockchickenz.com. 14400 IN A 78.137.164.51
www.rockchickenz.com. 14400 IN CNAME ghs.google.com.

This is what you need:

rockchickenz.com. 14400 IN A 216.239.32.21
rockchickenz.com. 14400 IN A 216.239.34.21
rockchickenz.com. 14400 IN A 216.239.36.21
rockchickenz.com. 14400 IN A 216.239.38.21

www.rockchickenz.com. 14400 IN CNAME ghs.google.com.

The advice references a typical ASymmetrical DNS custom domain setup - the address set used in 99% of all custom domain setups. Note here, the specified TTL of "14400" (4 hours).

Using the above advice, the blog owner can then, if necessary, research the syntax used by the registrar's dashboard (aka "zone editor") - and make the necessary changes.

Alternate / complementary tools used.

Alternate tools, which can be used to generate a Dig log, are the Kloth.Net Dig DNS Lookup, and the Who.Is DNS display. Neither alternate is as compact and complete - but they can be used to verify results.

Complementary tools include the Global DNS Propagation Checker, the intoDNS domain DNS health checker, the Rex Swain HTTP Viewer, and the Whois Lookup.

In some cases, my 12 link affinity / differential connectivity test may be useful.

For more information.

See WikiPedia: dig (command).


One of the most useful tools, for diagnosing #Blogger custom domain problems, is a Dig Log. Learning how to read a Dig Log is a useful skill, for any blog owner wishing to publish a blog to a custom domain.

URL Availability Competition, During "Buy a Domain", Is Similar To "Create a Blog"

Some Blogger blog owners, trying to setup a new blog, discover the hard way that other people are trying to do the same thing.
When I try to use "Create a blog", I keep seeing
This name is not available.
or
Blogger is saying it's available - but as I begin to register, it says that it has already received a request for this name.


Other blog owners discover that the competition between Blogger blog owners, when using "Create a blog", also applies to "Buy a domain". And worse yet, "Buy a domain" involves competition with would be website owners outside Blogger / Google.

Besides the competition with other buyers, there's a problem that the domain purchase process takes time - and during the purchase process, someone else can be purchasing the same domain also.

The longer the purchase process takes you, the greater the possibility that someone else may "steal" the domain from you. You, and the unseen other person, may start the purchase at the same time - but the person who gets the money to their registrar first gets the domain.

Let's use "Create a blog" as a simple example of an address selection process.
  1. You type the blog name, of your choice.
  2. With every character you type, Blogger checks for availability.
  3. Initially, with not enough characters typed, you see bad news.
    Sorry, this blog address is not available.
  4. When you have typed enough characters so you are now requesting a unique name, you see good news.
    This blog address is available.
  5. Since you have, hopefully, already entered a Title and selected a Template, you now hit the "Create blog!" button.
  6. Hoping that you were fast enough, the address which was available half a second previously is available as you hit the button - and the blog name of your preference becomes your new blog name.
  7. If you were not fast enough, someone else might have snuck in front of you. Instead of seeing your new blog, you now see the bad news.
    Sorry, this blog address is not available.

The "Create a blog" wizard is simple.
  1. You see good news.
  2. You hit "Create blog!".
  3. You are done.

Even with a "Create a blog" selection period of 1 second - and if your reflexes are not that good, it could take you longer - you could lose out. What if the selection process was longer - instead of 1 second, say 5 minutes? The "Buy a domain" process is a bit more complicated, than "Create a blog".
  1. You enter an available domain URL.
  2. You hopefully see the good news.
  3. Now, you pay for the purchase.
  4. You enter all of the details, about your bank account.
  5. Google charges your bank a token amount, to verify that you actually entered a valid bank account number.
  6. You hopefully see more good news.
  7. Now, Google passes the purchase to the registrar.
  8. The registrar sends the actual purchase to your bank.
  9. Your bank credits the account of the registrar.
  10. The registrar then registers the domain, in your name.
  11. Google can then setup the addresses in the domain.
  12. Blogger can then publish the blog, to the domain.
  13. And hopefully, the blog is now live (and In Transition) with the domain URL.

The "Buy a domain" wizard is not simple.
  1. You enter an available domain URL.
  2. ...
  3. The registrar registers the domain, in your behalf.
  4. You are done.
Unfortunately, during the amount of time that it takes your bank to pay your registrar, somebody else could be buying the same domain, from another registrar. The longer that it takes your registrar to get paid, the greater the chance that someone else may register the domain, which you have supposedly paid for, before your purchase is complete.

Unfair? Certainly. But, based on the worldwide Internet based domain registry system, it can happen. What's worse, the symptoms of an unsuccessful domain purchase are similar to an attempted purchase restart.

And that leaves you with the uncertainty, when you post in Blogger Help Forum: Something Is Broken.
Blogger is saying it's available - but as I begin to register, it says that it has already received a request for this name.
And sometimes, after you wait the legendary 2 to 3 days, you find that someone else bought the domain, while you were waiting.

>> Top

Adding Ownership Verification For Your Custom Domain? Examine The Error Display

Sometimes, you have to step outside the box, to complete a Blogger blog task.

The task of adding domain ownership verification, to a custom domain purchased using "Buy a domain", is one example of stepping outside the box. I advise people that tweaking DNS settings, in general, is a task best undertaken by someone with "Advanced" experience with Blogger custom domain publishing.

Unfortunately, domains purchased using "Buy a domain" are occasionally subject to incomplete setup - and correction of an incomplete setup involves republishing the domain. And republishing the domain requires verification of domain ownership.

To a first time domain owner, the task of verifying domain ownership is surely a bit scary.
We have not been able to verify your authority to this domain.

This initial accusation is followed by the instructions
On your domain registrar's website, locate your Domain Name System (DNS) settings and enter the following two CNAMEs:

The challenge, for many, is getting to the Domain Name System (DNS) settings, aka the Zone Editor.
  1. Login to Google Apps.
  2. Find the instructions for logging in to the registrar's website.
  3. Login to the registrar's website.
  4. Find the registrar's Zone Editor wizard.

Having completed Steps #1 - #4, adding the "CNAME" is almost an anticlimax. See the instructions?


On your domain registrar's website, locate your Domain Name System (DNS) settings and enter the following two CNAMEs:

Name, Label, or Host field Destination, Target, or Points To field

www ghs.google.com

i7vgls457wxc gv-fbz2zptam3ucji.dv.googlehosted.com

Once you have access to the Zone Editor, look for "www", added by "Buy a domain". See how it's formatted, in the display?
  • Add the second "CNAME", mirroring the format and syntax of the first.
  • Note the example of the second, shown here as "i7vgls457wxc" - though when you setup your domain, you will surely see different values for both "i7vgls457wxc" and "gv-fbz2zptam3ucji.dv.googlehosted.com")
  • Refresh the Zone Editor list, and compare the "www" and "i7vgls457wxc" entries.
  • If you added the new entry properly, the format and syntax, of the two entries, will be identical.

Having successfully added your new "CNAME", go back to the Blogger Publishing wizard, and publish the blog to the domain. Finally, wait a few days for Transition to expire - and while you wait, plan what to do, next.

>> Top

Forwarding A Domain Requires Experience

I constantly advise Blogger blog owners to avoid forwarding, when setting up custom domain publishing.

In the rare cases where forwarding is actually required, not every blog owner reports success.
My blog now displays a non Google search page!
or worse
My blog now displays
404 Not Found
What did I do wrong??
Depending upon what setup work was done by the blog / domain owner, and what effort is required by the registrar, one may expect to see, quite predictably, either of the above errors.

When you just publish your blog to the primary domain, you're using the Blogger Publishing wizard.

Many domains will require two settings, to forward a domain.

When you forward a secondary domain to the primary domain, you're using the DNS Manager wizard provided by the registrar, for that secondary domain. Frequently, this is a 2 step process.

  1. You use the DNS Manager for the secondary domain, and designate the primary domain as the forwarding target for this domain.
  2. You setup a DNS address for the secondary domain URL, and target the redirection server - as provided by the DNS host.

Some domains may make one setting, for you, automatically.

Some wizards will handle one step for you automatically, while others will require that you do both steps separately. I have had both experiences, when forwarding different domains using the GoDaddy DNS manager. You may need to experiment, here - or ask an experienced technician at the registrar, for advice.

If both settings are not made, the domain will not forward properly.

If your zone editor requires that you perform both steps separately, and you only do the first, your domain gets redirected to the redirection server. If you don't define a redirection target, you have a parked domain, similar to an expired domain - and your domain will serve the ads display page provided by the registrar.

If your zone editor requires that you perform both steps separately, and you only do the second, your domain will be properly redirected from the redirection server - but the redirection server will not be defined, for your domain. If the redirection server isn't defined, the domain will be "404".

You may need to contact your registrar, for detailed instructions.

If your registrar does not provide explicit instructions - or if you use the domain manager wizard and get either of the above results, it may be time to contact a registrar customer service representative - and possibly, insist on support from a senior technician. Using a third party registrar, or a third party DNS hosting service, you may have to improvise.

Forwarding a domain - when you must serve two domains (or more) from one blog - is simply not a task for the inexperienced.

The Task Of Forwarding A Domain Requires Experience, Persistence, And Research

I constantly advise Blogger blog owners to avoid forwarding, when setting up custom domain publishing.

In the rare cases where forwarding is actually required, not every blog owner reports success.
My blog now displays a non Google search page!
or worse
My blog now displays
404 Not Found
What did I do wrong??
Depending upon what setup work was done by the blog / domain owner, and what effort is required by the registrar, one may expect to see, quite predictably, either of the above errors.

When you just publish your blog to the primary domain, you're using the Blogger Publishing wizard.

Domain forwarding frequently requires two steps.

When you forward a secondary domain to the primary domain, you're using the DNS Manager wizard provided by the registrar, for that secondary domain. Frequently, this is a 2 step process.

  1. You use the DNS Manager for the secondary domain, and designate the primary domain as the forwarding target for this domain.
  2. You setup a DNS address for the secondary domain URL, and target the redirection server - as provided by the DNS host.

Some wizards will handle both steps for you automatically, while others will require that you do both steps separately. I have had both experiences, when forwarding different domains using the GoDaddy DNS manager. You may need to experiment, here - or ask an experienced technician at the registrar, for advice.

The registrar may require both steps, done by you separately.

If your registrar requires that you perform both steps separately, and you only do the first, your domain gets redirected to the redirection server. If you don't define a redirection target, you have a parked domain, similar to an expired domain - and your domain will serve the ads display page provided by the registrar.

If your registrar requires that you perform both steps separately, and you only do the second, your domain will be properly redirected from the redirection server - but the redirection server will not be defined, for your domain. If the redirection server isn't defined, the domain will be "404".

With no instructions provided, contact the registrar customer care group.

If your registrar does not provide explicit instructions - or if you use the domain manager wizard and get either of the above results, it may be time to contact a customer service representative. Using a third party registrar, or a third party DNS hosting service, you may have to improvise.

Forwarding a domain - when you must serve two domains (or more) from one blog - is simply not a task for the inexperienced.

When You Setup A Custom Domain, Please Know And Observe Your Limits Of Expertise

Too many blog owners, when they setup a custom domain for their blog, do not consider the details.

We see signs of the problem, too often, in Blogger Help Forum: Something Is Broken.
Can someone give me step by step instructions for setting up a custom domain with xxxxxxx registrar? I contacted xxxxxxx customer service - and they told me a lot of things I didn't understand! Would it be easier just to transfer the domain to GoDaddy?

The short answer here would be
Yes, it would be easier just to transfer the domain to GoDaddy.
Unfortunately, that answer is not completely correct - and the correction may leave you with a broken domain.

Too many blog owners, eager to setup a non BlogSpot URL for their blog, do not consider the details involved, when they bypass "Buy a domain".

Part of the blame, for this problem, has to fall onto Blogger's head. People using "Buy a domain", for their first domain purchase, see the domain purchase as such a simple process. They never become aware of the complexities involved in a domain purchase, until they setup their second domain, and decide to "roll their own".

Let's look at the levels of experience needed.
  • Beginner: Use "Buy a domain".
  • Intermediate: Use the Google Apps or Google Wallet wizard - or alternately, buy a domain from one of the 8 identified registrars.
  • Advanced: Buy a domain, directly, from any of the thousands of registrars, worldwide.


As of 2013 June, "Buy a domain" is not offered, as part of "Add a custom domain" - although blog owners, in the USA, may use Google Domains. This will leave people outside the USA with one option - "Advanced".
Beginner blog owners are strongly advised to use "Buy a domain". Choose an available domain, provide payment details, and your domain is setup. Wait until Transition expires, and get to work referring your readers, search engines, and other Internet services, to your new, non BlogSpot URL.

Intermediate blog owners, able to understand simple instructions, should be able to use the wizards provided by Google Apps or Google Wallet. Alternately, Blogger provides reasonably complete and simple instructions for setting up a domain with the 8 most popular registrars.

Advanced blog owners are free to choose any registrar, of the thousands out there. But beware! You are on your own, when you do this.
So choose your registrar according to your needs - and according to your skill level. Don't start a custom domain project, before verifying that your experience is complete. Make the right choice, before you sign on the dotted line.

Confusion About Advice "If you bought your domain name from Blogger, you won't need to create a CNAME record."

To Blogger blog owners who want their new non BlogSpot URLs to display their blogs, this conflicting bit of advice provides only confusion and doubt.
If you bought your domain name from Blogger, you won't need to create a CNAME record.

That advice was written to advise the use of the Blogger "Buy a domain" wizard, which provides non BlogSpot URLs for Blogger blogs, through a simple 15 minute purchase process. In September 2012, that simple process changed, slightly.

If you are trying to re publish your blog to a non BlogSpot URL - and you are seeing an "Error 12" / "Error 32", or similar message in the Publishing wizard display - you need to add a second "CNAME" address to your domain.

The new "CNAME", added in September 2012, allows you to verify ownership of the domain to the Publishing wizard. Any time you re publish your blog to a non BlogSpot URL, you have to verify ownership. This prevents people who are not you from deviously publishing their Blogger blog to your domain.

If you are reading this, and you are the owner of any website which provides advice on how easy it is to purchase a non BlogSpot URL for a Blogger blog - and part of your advice mentions
If you bought your domain name from Blogger, you won't need to create a CNAME record.
Please, edit your instructions to reflect the reality of domain ownership verification.

If you are reading this, and you know of a blog or website which provides the confusing advice
If you bought your domain name from Blogger, you won't need to create a CNAME record.
let us know, below.

Try and reduce the confusion, when people have to re publish their blog, after using the Blogger Publishing wizard - or possibly after buying directly from a registrar. Help us, to help you.

>> Top

When You Publish Your Blog To A Custom Domain, Almost Always Publish To The "www" Alias

Of all of the known problems with Blogger, in general - and of the known problems with Blogger / Google Custom Domain Publishing, specifically - surely the most frustrating single problem starts with the well known monolithic error
Another blog or Google Site is already using this address.

The most frequently seen solution to this problem, contrary to the opinions expressed in some blogs and websites, starts with correction of the domain DNS addresses. But even after careful DNS address correction, some blog owners still report the well known "Another blog ..." error.

Maybe 99.99% of the custom domain published blogs use what I call an asymmetrical DNS address configuration.
mydomain.com. 3600 IN A 216.239.32.21
mydomain.com. 3600 IN A 216.239.34.21
mydomain.com. 3600 IN A 216.239.36.21
mydomain.com. 3600 IN A 216.239.38.21
www.mydomain.com. 3600 IN CNAME ghs.google.com.
Note the restriction with the asymmetrical configuration, sometimes overlooked.
With an asymmetrical configuration, you may not publish to the domain root. Your only valid choice is to publish to "www.mydomain.com", and select "Redirect mydomain.com to www.mydomain.com". If you publish to "mydomain.com", you will eventually see
Blogs may not be hosted at naked domains.
or maybe a well known monolithic error
Another blog or Google Site is already using this address.

The conclusion is simple. Unless you intentionally created a symmetrical or non root virtual host address configuration, always publish to the "www" host. And, even though you do publish to the "www" host, understand that righteous addressing of the domain root is a necessity - not an option.

>> Top

Adding The Domain Ownership Verification "CNAME", For A Non Root Virtual Host

Now that the new required custom domain publishing ownership verification feature has been out for several months, we are seeing it used in domains with multiple virtual hosts.

A few blog owners are even publishing their blogs to non root virtual hosts - and here we are seeing a new reason for a persistent Error 12 / 32, which just can't be solved.
I have followed all of the instructions, and I am still seeing Error 12. Help!

The "Advanced settings" Error 12 instructions - now provided on screen instead of requiring the blog owner to open an external "Settings instructions" document - require careful examination.

We have to look very closely at this variation on the publishing instructions, when publishing to a non root virtual host.
Advanced settings

http://www.blog.mydomain.com

We have not been able to verify your authority to this domain. Error 12.
On your domain registrar's website, locate your Domain Name System (DNS) settings and enter the following CNAMEs:

  Name, Label, or Host field    Destination, Target, or Points To field

  www                           ghs.google.com

  xxxxxxxxxxxx               gv-xxxxxxxxxxxxxxxxxxxxxxxxxxxxxxxxxxxxxxxxxxxxxxxxx.domainverify.googlehosted.com.

See our detailed instructions on providing CNAMEs for various registrars or see the full settings instructions for more details.
Taking these instructions at face value, and adding a "CNAME" record of relative Name value "xxxxxxxxxxxx" to verify the publishing address of "www", the blog owner is going to continue to see an "Error 12" or "Error 32" for a long time.

We have to look, very carefully, at the "Advanced settings" publishing address - in this case
www.blog.mydomain.com
In the registrar's Zone Editor (aka "Domain Manager" wizard), we see the Name value entered as an address relative to the domain root.
  • With "www" entered for the Name, this provides a published address of "www.mydomain.com".
  • With "www.blog" entered, this provides a published address of "www.blog.mydomain.com".

The Name value, for both "CNAME"s, as specified in the "Advanced settings" instructions, is relative to the domain root.
  • A Name of "www", to provide a published address of "www.blog.mydomain.com", should be entered as "www.blog" in the Zone Editor.
  • Similarly, a Name of "xxxxxxxxxxxx", to provide a published address of "www.blog.mydomain.com", should be entered as "xxxxxxxxxxxx.blog" in the Zone Editor.

Entering the domain ownership verification "CNAME" relative to the published URL allows non root virtual hosts to be used, in the domain, without chance of conflict.
  • To publish to "blog.mydomain.com", we add a domain ownership verification "CNAME" of "xxxxxxxxxxxx.mydomain.com" (with the proper value of "xxxxxxxxxxxx").
  • To publish to "www.mydomain.com", we add a domain ownership verification "CNAME" of "xxxxxxxxxxxx.mydomain.com" (with the proper value of "xxxxxxxxxxxx").
  • To publish to "www.blog.mydomain.com", we add a domain ownership verification "CNAME" of "xxxxxxxxxxxx.blog.mydomain.com" (with the proper value of "xxxxxxxxxxxx").
We simply have to read the "Advanced settings" instructions, and enter the Name values in the Zone Editor, considering the context of the instructions.

>> Top

After Using "Buy a domain", Blog Owners Are Seeing "Server error" From Google Apps

Ever since Google ended its free Google Apps accounts, we've been seeing reports in Blogger Help Forum: Something Is Broken, about problems encountered when setting up a new Google Apps account, to administer a newly purchased custom domain.
Every time I try to login to Google Apps, using instructions in the email message, I get
Server Error: We could not process your request at this time, please try again later.

The limited function free Google Apps accounts, which can be only used for domain maintenance, do not work with the Google Apps account setup wizard, which is generally used after using "Buy a domain". When you see "Invalid request" or "Server error", you need to reset the password for the "bloggeradmin" account, for your domain.

Start by accessing the Google Apps administrative account reset wizard, for your domain. If you use GMail for your email, or other Google products, try to use a different browser for Google Apps. Alternately, use an "Incognito" window, in Chrome - or a "Private" window, in Firefox. Or, clear cache, cookies, and sessions - then restart the browser, when possible.

For this domain, "nitecruzr.net", I would access the account reset wizard as
http://google.com/a/cpanel/nitecruzr.net/ResetAdminPassword
or possibly
http://google.com/a/nitecruzr.net/ResetAdminPassword

You simply change "nitecruzr.net", to your domain URL, to reset the administrative password for your domain.
(Update 2013/11/03): This process should be slightly simplified, with Google Apps now using the new integrated Google login screen.
Having solved the CAPTCHA in the reset screen, Google will send a password reset email message, for the "bloggeradmin" account for your domain, to the email address used by your Blogger account. Once again, this is a bad time to be using Blogger anonymously.

Open your email, then open and execute the email message, to reset the bloggeradmin Google Apps account. Be sure to enter the complete Google Apps account name, in the Google account reset screen.

Once the password is reset, login to Google Apps. Then retrieve the login tokens, from the Google Apps desktop, to access eNom or GoDaddy.

>> Top

Contact Us

24x7 online , we happy to answer you
tamilcypc@gmail.com

Disclaimer

This Blog and its TUT's are intended for educational purposes only, no-one involved in the creation of this TuT may be held responsible for any illegal acts brought about by this Blog or TuT.


Featured Post

Custom Domains And HTTPS Redirection Code