
Transmitting Data Via Hidden Form Fields
Info[SEC*] Redemption: Transmitting Data Via Hidden Form Fields: It is pretty obvious thing that web application passes data to user in different form. Its not the only one way transaction,sometimes user ...
CyberCrime - From A Different View Point
Info[SEC*] Redemption: CyberCrime - From A Different View Point: Many of you are already familiar with cyber crime. I am just going to share which are the areas in cyber crime that one should keep in min...
Information Gathering - Why? How? & What?
Info[SEC*] Redemption: Information Gathering - Why? How? & What?: Lets suppose any thriller stealing movie. Think what does robbers do before they hack the bank or anything else? They gather the informati...
How to use arachni-web in kali linux

Intro - Arachni is an Open Source, feature-full, modular, high-performance Ruby framework aimed towards helping penetration testers and administrators evaluate the security of web applications.
1. How to open
A. GUI Method
Application → Kali linux→ Web Applications → Web Vulnerability Scanners → arachnid-web
(click on image for large view)

2. when you first time starting arachni you need to add a dispatcher. Just click on add for adding it.

3. This is Start a Scan Tab First of all write your target website on the url area than click on launch scan. After some time your scan will be start. But before starting scan if you want, you can setup modules plugins etc visit next image for more info…

4. This is Modules tab here you can choose your modules by simply click on check and uncheck. After you have done don’t forget to save it. Of course you have to choose your modules before starting your scan.

5. This is Plugins Tab you need to check or uncheck. As you can see some plugin doesn’t support webUI.

6. Setting tab – here you can setup according to your need from auditor, crawler option etc..

7. Log Tab – This is a log file more info on image.

8. This is report tab in this tab you can save/view your scan result in different type of formats like text,html,xml etc..

9. This is our scanning repot in HTML format.

10. For getting this tab you have to go to Reports → HTML reports → Issues (Under summary). Here you can see we got 4 issues from our scan. You can see these issues with little description through this tab.

11. This is issues tab here you can see all issues with more details.

12. after setting up all things and launching for a scan your scanning progress will be shown like this image.

(click on image for large view)
Python Service Banner Grabbing Script
Info[SEC*] Redemption: Python Service Banner Grabbing Script: Hello Guys I have written some small banner grabbing script in python. It is very simple and basic. By using this script you can check the ...
Juicy Areas of Web Application For Pentesters
Info[SEC*] Redemption: Juicy Areas of Web Application For Pentesters: In this tutorial I am going to write small things which everyone knows already but I am trying to convey it in another manner of checklist...
GoLismero - The Web Knife Version 2.0 beta Released
GoLismero is an open source framework for security testing. It's currently geared towards web security, but it can easily be expanded to other kinds of scans.
The most interesting features of the framework are:
The most interesting features of the framework are:
- Real platform independence. Tested on Windows, Linux, *BSD and OS X.
- No native library dependencies. All of the framework has been written in pure Python.
- Good performance when compared with other frameworks written in Python and other scripting languages.
- Very easy to use.
- Plugin development is extremely simple.
- The framework also collects and unifies the results of well known tools: sqlmap, xsser, openvas, dnsrecon, theharvester...
- Integration with standards: CWE, CVE and OWASP.
15k Twitter Account Hacked, A True Story?

Few days back an article was published on techworm.in, where a hacker named "Mauritania Attacker" leaked claimed to leak thousands of twitter accounts, the data was made available for public to use and was uploaded on zippyshare.com. The data contained the twitterid, twitternick, oauthtoken nand oauth_token_secret.

How Was the data breached?
Well, it seems to me that the database of a third party app was breached which contained the list of Oauth tokens. In laymen terms oauth is used for authorizing the third party applications without the need of giving them the password.
The application is granted an access token which it uses to authorize it selves, which means that an attacker having hold of the access token would be able to access the twitter accounts without the need of a password. The Oauth tokens can be easily be by tampering the request with a webapplication proxy such as Tamper Data, Burp suite etc. Twitter has recently introduced Two step authentication, however it isn't much handy in this case.
How Twitter Users Can Protect Themselves?
Well, if the attacker keeps compromising database of the third party applications and getting the hold of the oauth tokens, then their is not much that twitter can do, Since they can protect their database from being breached, however they certainly have no hold of the third party application database.
Twitter users are advised to revoke access to all the third party application and reauthorize them, therefore the access tokens would be expired and the attacker would not be able to use them. Twitter users should only use trusted third party applications and when they are not using any of them, they should revoke the access so that the access token would be expired.
Facebook, has also known issues with their oauth in past, Security reseachers have pointed multiple flaws and all of them relied upon stealing of the oauth tokens, The issue with twitter in this case is a bit different, the access tokens were compromised due to a third party app, whereas in facebook oauth tokens could have been compromised due to a flaw inside it's design.
Twitter has denied the claims made by an attacker that any part of the twitter's database was compromised, which seems true to me. The Mauritania Attacker has posted a status on his facebook that he will reveal exactly how the access tokens were compromised today to techworm.

Stay subscribed to RHA for more of the security insights.
How to install Kali Linux on your Hard Disk
Intro - Kali Linux is a Debian-derived Linux distribution designed for digital forensics and penetration testing. It is maintained and funded by Offensive Security Ltd. Mati Aharoni and Devon Kearns of Offensive Security developed it by rewriting BackTrack, their previous forensics Linux distribution.


Hardware requirement -
- A minimum of 8 GB disk space for the Kali Linux install.
- For i386 and amd64 architectures, a minimum of 512MB RAM.
- CD-DVD Drive / USB boot support
Preparing for installation -
- Download Kali linux. ( link )
- Burn The Kali Linux ISO to DVD or Image Kali Linux Live to USB.
- Ensure that your computer is set to boot from CD / USB in your BIOS.
Kali Linux Installation Procedure
To start your installation, boot with your chosen installation medium. You should be greeted with the Kali Boot screen. Choose either Graphical or Text-Mode install. In this example, we chose a GUI install.
(Click on Image for Large View)

Select Language – English

Select Location – United State

Configure the keyboard – American English

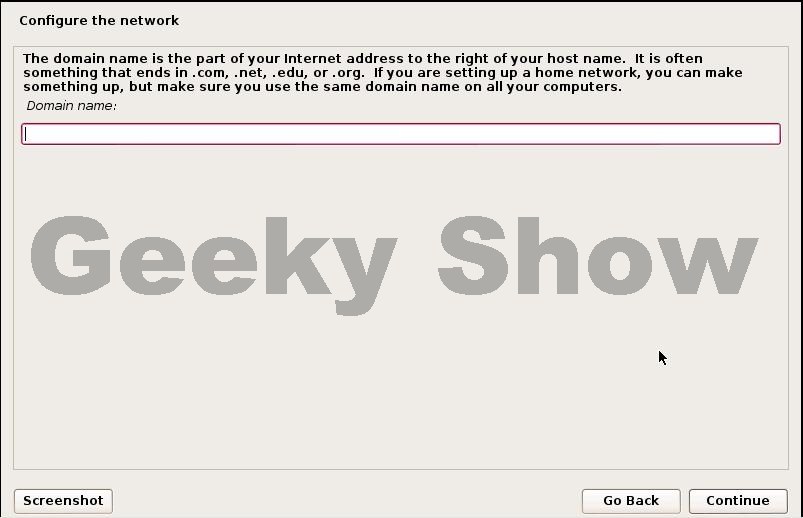
Configure the network

Leave blank and click on continue
Set up users and password – write root password and click on continue

Configure the clock – Eastern

Partition Disk – here you have option to choose how do u want to install your os. Here we will discuss in two option. 1St Use Entire Disk and 2nd Manually. Use Entire disk means os will create your whole hard disk in one partition and OS will install in this partition. And Manually means you can create a separate partition for your Kali Linux OS and install it on the separate partition. I recommend if you are advance user than play with manually otherwise go with ‘use entire disk’ but remember the meaning of it.
Here we are choosing Manually

After choosing manually this window will appear – select your hard disk and click on continue

Select yes and click on continue

Select above image’s highlighted option and click continue

Create a new partition – here we can choose ‘automatically partition the free space’ (recommend for new user) or create a new partition ( for advance user)
Here we are choosing create a new partition and click on continue

Write the size of partition it should be more than 10 GB

Select Primary and click on continue

Select beginning and click on continue

Select ‘Done setting up the partition’ and click on continue

Select ‘Finish partition and write change to disk’ and click on partition

Select ‘No’ and click on continue

Select ‘Yes’ and click on continue

Install the system ( it takes time)

Configure the Package manager – use a network mirror ( If you will choose ‘Yes’ than ready for online updates and it takes lot of time so better to choose ‘No’ if you have slow net connection )
Here I am choosing ‘Yes’

Leave blank and click on continue

Install the grub boot loader – Select ‘Yes’ and click on continue

Installation Finished

Now click on Other
Write username ‘root’ and click on log in

Write your password which you written during the OS installation and click login

Successfully Log In

(Click on Image for Large View)
How to use Webshag-gui in kali linux

Intro - Webshag is a multi-threaded, multi-platform web server audit tool. Written in Python, it gathers useful common functionality for web server auditing like website crawling, URL scanning or file fuzzing.
The common functionalities of the webshag are -
- Port Scanning .
- Web Crawling.
- Url Scanning.
- Retrieving the list of domain names .
- File fuzzing .
1. How to open
A. GUI Method
Application → Kali linux→ Web Applications → Web Vulnerability Scanners → webshag-gui
(Click on Image for Large View)
(Click on Image for Large View)

B. Open Terminal type webshag-guiand hit enter

2. Here we didn’t configure webshag properly before using so we got this error while Uscan.
ERROR : Invalid configuration value for ‘custom_db_dir’ parameter

3. Another error on FUZZ

4. Now time to set configure file so let’s start. First of all open webshag.conf file for this use these command after opening terminal
a. cd /usr/share/webshag/config
b. leafpad webshag.conf

5. Now locate the webshag config file by typing locate webshag command on terminal

6. So we have we have locate webshag info and webshag.conf file now copy some configuration source from locate webshag and paste it on webshag.conf file.
View image for finding out which one you need to copy and paste.

7. Save webshag.conf file.

8. Pscan - Write your target host/IPv4 in target field than click ok, your scan will be start. As result you will see all open ports and ports details.

9. Spider – Write your target host/ IPv4 in target area than click on OK, As result you can see internal directories, Emails and external links which are attached with your host/IPv4.

10. UScan – This scan is most important part in webshag. Uscan will find out vulnerability in target host and also tell you about exploit. Write your target host in target area than click on OK for starting Uscan. As result you can see we found remote vulnerabilities in our target url.

11. Fuzz - As we all know is a Fuzzer which also runs through the site and find the folders of the services that are running on that site.

(Click on Image for Large View)


![SQL Injection Basics - Union Based [Detailed Tutorial]](https://blogger.googleusercontent.com/img/b/R29vZ2xl/AVvXsEjjQpa2wuMB-m5CXPVf71GUOkfiIOQA8KTyQ-_zfAl0SZa23UBN1QJaO2ZMGRDZlmDJTYf2jJ4ik3Xnj1locc38Yv9l6VMxTWt32s86JtXtLABDn20DRuAcbLPKMb9m2hc6PDmjIjvU-us/s72-c/SQL-Injection-Attack.jpg)


