Intro - The main purpose of Joomscan is to detects file inclusion, sql injection, command execution vulnerabilities of a target Joomla! web site.Joomla! is probably the most widely-used CMS out there due to its flexibility, user-friendlinesss, extensibility to name a few. So, watching its vulnerabilities and adding such vulnerabilities as KB to Joomla scanner takes ongoing activity.It will help web developers and web masters to help identify possible security weaknesses on their deployed Joomla! sites.
1. How to open
A. GUI Method
Application →Kali linux → Web Applications → Web Vulnerability Scanners → joomscan
(click image for large view)
B. open terminal and type joomscan
2. This command is used to scan a target for finding the vulenerabilities .
Syntax – joomscan –u target url
Ex – joomscan –u djmaza.in
3. As you can see the scan has been started and as result it is showing us – server information means which server using this website, Anti scanner and joomla firewall etc..
4. This is the 2nd image of our scan result ( sorry I can’t show you whole scan image due to large scanning). So, here you can see fingerprinting, and the most important part ‘Vulnerabilities’. At the end of #1 scan you will notice this is saying ‘Vulnerable ? Yes’ It means we got a weakness of target website.
5. Here you can see total number of vulnerabilities which found on scan and you can also notice the scan time.
Recon-ng is an open-source framework coded in python by Tim Tomes a.k.a LaNMaSteR53. Its interface is modeled after the look of the Metasploit Framework but it is not meant for exploitation or for spawning a meterpreter session or a shell, it is for web-based reconnaissance and information gathering. It comes with modules to support your web reconnaissance adventure and information gathering just like Metasploit's auxiliary and exploit modules. Modules are categorized into Discovery, Experimental, Recon and Reporting. As of this writing here are the modules with its subcategories:
I am also one of the contributors for this framework and has contributed mostly to the Discovery modules.
In this article I'm going to emphasize the Backup File Finder module which I authored together with Tim Tomes (the main developer of Recon-ng). This module can be used for checking specific hosts for exposed backup files. The default configuration searches for wp-config.php files which contain WordPress database configuration information.
As a side note, this module is inspired by cmsploit.
Basic Usage: load discovery/info_disclosure/http/backup_finder (use the module)
show options (shows the options that can be set for the module)
set source target.com (the host you want to crawl)
set uri config_file (configuration file you want to check, ex. wp-config.php)
Here is the screenshot of the Backup File Finder's actual crawling.
Now, here is what's inside in a typical configuration file:
define('DB_NAME', 'wordpress'); /** MySQL database username */ define('DB_USER', 'root'); /** MySQL database password */ define('DB_PASSWORD', 'passwd'); /** MySQL hostname */ define('DB_HOST', 'localhost'); /** Database Charset to use in creating database tables. */ define('DB_CHARSET', 'utf8'); /** The Database Collate type. Don't change this if in doubt. */ define('DB_COLLATE', ''); List of the various configuration files used by popular CMS' which can be set to the option uri:
wp-config.php >> WordPress config.php >> phpBB, ExpressionEngine configuration.php >> Joomla LocalSettings.php >>MediaWiki mt-config.cgi >> Movable Type settings.php >> Drupal About The Author This article has been written by Jay Turla, he is a security researcher at Infosec, along with security research he also performs vulnerability research too.
Intro – In this tutorial we will use sslstrip for stealing password from any PC which is connected in LAN. SSLStrip basically hijacks HTTP traffic. Now a days its little difficult to steal password of some website.
1. How to open
A. GUI Method
Application →Kali Linux → Information gathering → SSL Analysis → sslstrip
(click on image for large view)
B. Open terminal type sslstrip –h this command will open sslstrip with help option
Before starting sslstrip we need to do some other works for trapping our target
a. IP forwarding
b. IP table for redirect 80 to 8080
c. Finding Gateway IP
d. Finding Target IP
e. Arpspoof
2. This command is used to enable IP forwarding.
Syntax – echo ‘1’ > /proc/sys/net/ipv4/ip_forward
3. This command is use to redirect requests from port 80 to port 8080 to ensure our outgoing connections (from SSL Strip) get routed to the proper port.
5. This is our Target OS Windows XP, by using ipconfig we got the target IP. I know you are thinking if I want to trap a unknown LAN PC then how will we find out the IP address. Well its not more difficult some Social engineering can do your job. Come to the point on sslstrip tutorial. So note down the target IP.
6. This command is use to redirect all network HTTP traffic through our computer using ARPSpoof (don’t forget to enable IP forwarding before this)
Syntax – arpspoof –i interface –t target IP –r gateway Ip
Ex – arpspoof –i eth0 –t 192.168.71.128 –r 192.168.71.2
7. Now we need to open a new terminal because this terminal is running arpspoof and we can’t stop it right now.
8. In new terminal use this command , This command is used to listening port. "-l" tells the system to listen on specified port.
Syntax – sslstrip –l 8080
9. Now come to the target OS and open www.gmail.com and enter your username and password than click on sign in. Its normally like we are use for checking our gmail.
10. after clicking sign in on target os come to the attacker PC (Kali Linux). You will see sslstrip capture some data after finishing the capture press ctrl + C for stopping sslstrip. Data automatically save in a file named sslstrip.log.
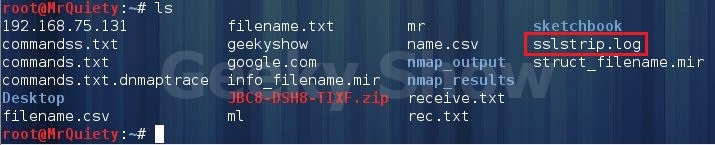
11. Here use ls command so you can see the saved file as sslstrip.log.
12. use cat and open your sslstrip.log file and watch carefully. Hmm there is your victim email id and password as shown in image.
3. now run this it adds repository for the installation Syntax – echo –e “\ndeb http://downloads.sourceforge.net/project/ubuntuzilla/mozilla/apt all main” | tee –a /etc/apt/source.list> /dev/null
For verification this added in your source list or not you can open /etc/apt/source.list with your text editor
Intro - SSLScan is a fast SSL port scanner. SSLScan connects to SSL ports and determines what ciphers are supported, which are the servers prefered ciphers, which SSL protocols are supported and returns the SSL certificate. Client certificates / private key can be configured and output is to text / XML.
1. How to open
A. GUI Method
Application →Kali Linux → Information gathering → SSL Analysis → sslscan
(click image for large view)
B. Open Terminal type sslscan and hit enter
2. Here we are scanning a domain with simple sslscan command. I will explain you about result on image
Syntax – sslscan domain/host:port
Ex- sslscan sail.co.in
We can also scan by IP kindly visit image for more info
A.Scan by IP
B.Scan by Domain
As you can see there are different cipher that server accepted
Here we can see it scan all type of ciphers which are possible on the target.
After completing the scan now you can see Prefered server cipher and SSL certification details.
3. This command is used to scan only accepted ciphers. Failed or rejected ciphers are ignored by this command.
Syntax – sslscan –no-failed sail.co.in
4. This command is used to scan only ssl3 ciphers.
Syntax – sslscan --ssl3 sail.co.in
5. This command is used to scan only tls1 ciphers.
Syntax – sslscan --tls1 sail.co.in
6. This command is used to save scan outout in xml format.
Syntax – sslscan --xml=filename domain/IP
Ex – sslscan --xml=quiety 180.179.212.205
7. Here you can see our saved output by ls command.
This Blog and its TUT's are intended for educational purposes only, no-one involved in the creation of this TuT may be held responsible for any illegal acts brought about by this Blog or TuT.


![SQL Injection Basics - Union Based [Detailed Tutorial]](https://blogger.googleusercontent.com/img/b/R29vZ2xl/AVvXsEjjQpa2wuMB-m5CXPVf71GUOkfiIOQA8KTyQ-_zfAl0SZa23UBN1QJaO2ZMGRDZlmDJTYf2jJ4ik3Xnj1locc38Yv9l6VMxTWt32s86JtXtLABDn20DRuAcbLPKMb9m2hc6PDmjIjvU-us/s72-c/SQL-Injection-Attack.jpg)


