

Intro – TrueCrypt is software for establishing and maintaining an on-the-fly-encrypted volume (data storage device). On-the-fly encryption means that data is automatically encrypted right before it is saved and decrypted right after it is loaded, without any user intervention. No data stored on an encrypted volume can be read (decrypted) without using the correct password/keyfile(s) or correct encryption keys. Entire file system is encrypted (e.g., file names, folder names, contents of every file, free space, meta data, etc).
1. How to open
A. GUI Method
Application → Kali Linux → Reporting Tools → Evidence Management → truecrypt
(Click image for large view)

B. open terminal type truecryptand hit enter also here we can see we have successfully opened truecrypt.

2. This is Help Menu this window will open when you use GUI opening method but after that you have to type truecrypt on terminal for opening it.

3. For creating new Volume click on ‘Create Volume’

4. As you can see there are two option ‘Create an encrypted fine container’ and ‘Create a volume within a partition/drive.’ If you will read the description, You will understand which option is suitable for your work. Here I am showing just an example also at this time I do not have any Pendrive for formatting and creating as a volume. After choosing your option click Next.

5. Again for knowing the options details you have to read description. I choose ‘Standard TrueCrypt Volume’and Click on Next.

6. This Windows says where you want to save your volume, Click on Select File.

7. Choose your location where you want to save your volume, Write your name as you want than click on Save.

8. Click Next

9. You can choose Encryption Algorithm. I am going with default setting. Click on Next

10. In this window you can see your Total Free Space. Write your volume size also you can change MB to GB or KB just click there and select your choice from drop down menu, after that click Next.

11. First I will advice you click on ‘Display Password’ so you will able to see what are you writing than write your password and click on Next.

12. This Window will appear when you type short password like I typed. If you will read the description of this window you will notice password should be more than 20 characters. So, if your password is more than 20 Characters this window will not appear. Click on Yesfor next process

13. Click on up and down arrow symbol for viewing the drop down menu.

14. As you can see here we can choose our Volume filesystem type so according to your need choose one of them and Click Next.

15. In this window we have two option ‘ I will mount the volume on other platforms’ and ‘I will mount the volume only on Linux.’ If you want to know the details about these options kindly read description which is shown on image below each option. Here we choose 1st option and Click on Next.

16. Kindly attention on this windows because this window little bit confusing. First of all let me tell you if you choose ‘I will mount the volume on other Platforms (Previous window)’ your filesystem type will be change into FATdoesn’t matter whatever you had chosen on previous process (image no. 14) so don’t be confuse that you have chosen Linux Ext2 in previous process and your volume has created FAT. Click OK

17. Here I am showing you what will be happen when you choose ‘I will mount the Volume only on Linux.’ As you can see in the description we can’t use this volume on other platforms expect Linux and also if we choose this option than no window will be appear related to FAT filesystem type. Lets choose this and click on Next.

18. Must read the description and move your mouse within this window than click on Format.

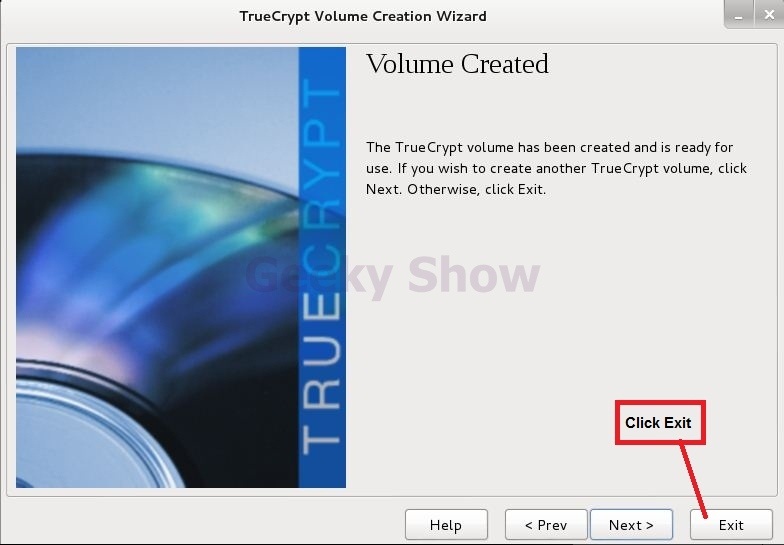
19. Congratulation you have successfully created The TrueCrypt volume. Click Ok

20. Click on Exit
21. Now we are going to check our Volume which we have created. First of all select number ‘1’than click on ‘Select File’

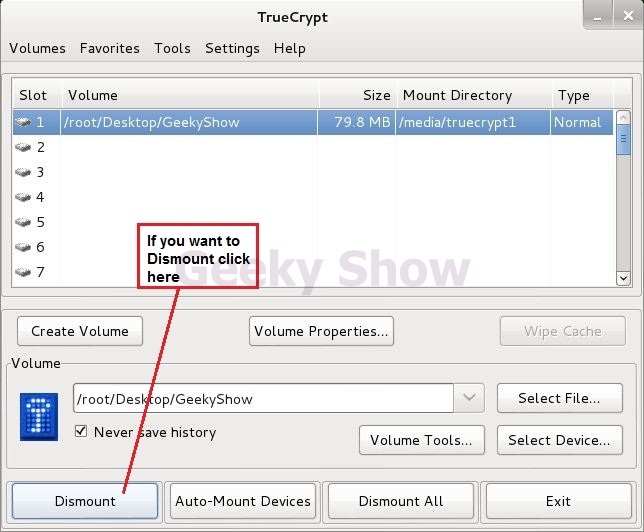
22. After click on ‘Select File’ this window will be appear Now find-out the location where your volume has saved and select it than click on Open.

23. Click on Mount

24. Before writing your password click on ‘Display Password’ by clicking this you can see what are you writing. Now write your Password and click Ok

25. Now right clickon your Volume path and click on Open

26. We have successfully mounted the volume.

27. If you want to Dismount the volume simply click on Dismount.
(Click image for large view)


![SQL Injection Basics - Union Based [Detailed Tutorial]](https://blogger.googleusercontent.com/img/b/R29vZ2xl/AVvXsEjjQpa2wuMB-m5CXPVf71GUOkfiIOQA8KTyQ-_zfAl0SZa23UBN1QJaO2ZMGRDZlmDJTYf2jJ4ik3Xnj1locc38Yv9l6VMxTWt32s86JtXtLABDn20DRuAcbLPKMb9m2hc6PDmjIjvU-us/s72-c/SQL-Injection-Attack.jpg)


No comments:
Post a Comment