Latest News

Showing posts with label Blog Villa. Show all posts

How to Apply google adsense from blogger

If you are working hard in your blog you deserve some positive result from your blog. Google adsense gives you an opportunity to earn money with your blog. You just need to apply application for your google adsense approval.
Before going, let me tell you,Your blog must comply with all Google Adsense Program policy in order to get approved by adsense team.

 1. Login to your Blogger Account , Choose your Blog , which you would like to apply for adsense from the list( if you own more than one)  in the dashboard .

2. Click on Earnings

3. Click on Sign up for Adsense
(Click on image for large view)

4. Click on Yes, Proceed to google account sign in

5. Write your Password and Click on Sign in

6. Click on Continue

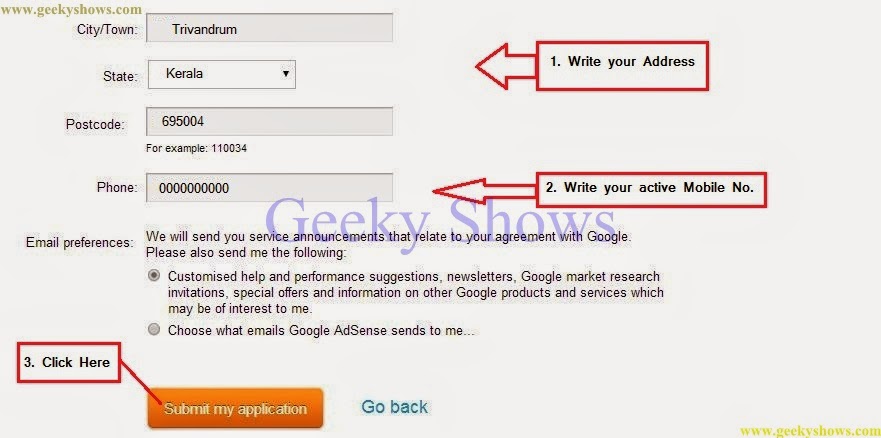
7. Select your county and Fill up your Personal Details. Payee Name should be according to your bank details and be careful while writing your street address you must need to write your house no. or street no. as well write an active mobile no. then Click on Submit my application

8. Click on Continue and Your are Done.
(Click on image for large view)
9. You will receive an email with 2 -7 days from Google Adsense regrading your google adsense approvable. If everything fine in your blog your adsense will be approve and google will approch you the next step of approval. 


Like it ? Share it.

Facebook Slide Out Share Button for Blogger


Now a days Facebook share button is very important to increase your blog traffic as well getting touch with your blog reader. So, here i am providing you a Facebook Silde out share button for blogger.
This widget has many features such as -
  • Lightweight Size
  • Compact Design
  • Supports all Major Browsers
  • Attractive and Elegant
  • Made with CSS3 and beautiful transitions.
  • Shown only on Post pages
Code :

<b:if cond='data:blog.pageType == "item"'>
<style>
/* Widget by geekyshows.com */
#fixed-share {background: none repeat scroll 0 0 #4C6699;border-bottom: 3px solid #30476F;bottom: 60px;box-shadow: 0 8px 8px #888888;font-family: Arial;font-size: 16px;padding: 15px 30px 15px 15px;position: fixed;right: -147px;text-align: left;text-transform: uppercase;transition: all 1s ease 0s;z-index: 10;}
#fixed-share:hover {right: 0}
#fixed-share:hover > #share-box {right: 147px}
#share-box {background: none repeat scroll 0 0 #4C6699;bottom: 72px;box-shadow: 0 8px 8px #888888;height: 40px;position: fixed;right: 1px;text-align: center;transition: all 1s ease 0s;width: 40px;}
</style>
 <div id="fixed-share">
 <div id="share-box">
<img src="http://s10.postimg.org/s1a8ghl6t/Fb_Logo.png" />
</div>
<span>Support Us<br/> <script>(function(d){ var js, id =
'facebook-jssdk'; if (d.getElementById(id)) {return;} js =
d.createElement('script'); js.id = id; js.async = true; js.src =
"//connect.facebook.net/en_US/all.js#xfbml=1";
d.getElementsByTagName('head')[0].appendChild(js);
}(document));</script>  <fb:share-button expr:href='data:post.url'
type='button_count'/> </fb:share-button>
</span></div>
<!-- Widget  by geekyshows.com -->
</b:if>

How to Do :
1. Copy above code
2. Login to your blogger and click on Layout then click on Add a Gadget

3. After Clicking on 'Add a Gadget' A window will appear then Click 'HTML/Java Script'

4. Soon a Configure HTML/Java Script window will appear. There you need to paste the code and Click on Save.

5. Done !


Like it ? Share it.

Create HTML Scroll Box on Blogger for Post


We are going to learn How we can create different type of HTML Scroll box for our blogger's post. 
Why need it ? - If you are blogger and if you want to show some kind of script code to your readers then this is very useful for you. Scroll box is very handy when you have a lot of data or text but limited space to display them. Besides text, the scroll box can contain images and HTML codes too! And, it's so easy to create one that can be located within your blog post or pages and even at the sidebar, footer or below a header for announcement and the like! It helps to save valuable space in your blog.
Different Type of HTML Scroll Box Code:
1. Most Simple Scroll Box Code :

<!-- Codes by geekyshows.com -->
<center><div style="text-align:left;width:150px;height:150px;overflow:scroll;padding:5px;">
WRITE YOUR TEXT HERE. 
</div>
</center>


How to Do :
A. First of all Copy the above code then Create a New Post. Click on HTML then Paste the above code
(Click on image for large view)
B. Click on Compose and Edit the Text as per your requirement 
(Click on Image for large view)

Editing The Code :
text-align:left - Your text will be start from left side. You can change it in center and right.
width:150px - If you want to change width of your scroll box just replace size of width as per your requirement. For Example width:400px
height:150px - If you want to change height of your scroll box just replace size of height as per your requirement. For Example height:300px
overflow:scroll - To tell the browser to add scrollbars to the box.
Changing Text - You can change your Text style color etc by using your blogger toolbar.

2. Auto Scrollbars - In the above example we used overflow:scroll to add scrollbars to the box. Another option is to use overflow:auto.
By using overflow:auto, the box will only grow scrollbars if the contents are too big to fit inside. In other words, scrollbars will only appear when they're needed.
Code A : Small line of Text so you will unable to see scrollbar with output 

<!-- Codes by geekyshows.com -->
<center>
<div style="text-align:left;width:250px;height:150px;overflow:auto;padding:5px;">
One small line of text by geekyshow. 
</div>
</center>
How to Do : Method is same as I have explained in 1st code
Output : This is our output as you can see there is no scrollbar because we have small line of text.

Code B : More Text of lines so this we will create a scrollbar automatically. see the output 

<!-- Codes by geekyshows.com -->
<center>
<div style="text-align:left;width:150px;height:50px;overflow:auto;padding:5px;">
This contains more text of line than the previous one. Because there's too much text to fit into the box, the box grows scrollbars. by geekyshow. 
</div>
</center>
How to Do : Method is same as I have explained in 1st code
Output : This is our output as you can see there is scrollbar because we have more line of text.

3. Scroll Box With color and border 
Code :

<!-- Codes by geekyshows.com -->
<center>
<div style="text-align:left;width:300px;height:150px;overflow:scroll;padding:5px;background-color:#FCFADD;color:#714D03;border:4px double #DEBB07;">
WRITE YOUR TEXT HERE BY GEEKYSHOWS. 
</div>
</center>

How to Do : Method is same as I have explained in 1st code
Output : This is our scroll box with color and border.

Editing Code :
background-color:#FCFADD - If you want to change your background color simply replace #FCFADD code with your own color code. For more color code Click Here
color:#714D03 - If you want to change Text color simply replace #714D03 with your own color code. 
border:4px double #DEBB07 - You can resize your border.


Like it ? Share it.

How to Promote Your Blog and Increase Visitors/Traffic

When i had started my own blog I was always worried about my visitors and blog traffic. I always look around from where i can get some visitors so it will increase my blog traffic. I have read many blog and other site about this topic. I was really very confused but after researching them carefully I got success as now you will be success. I like to share the magic behind getting more and more traffic.

1. Well mannered Articles - This is the most important part of any blog does't matter which topic you cover. Always try to write good content in your blog so your visitors will like it as well they share with others too. This will create a huge visitors for your blog.
Below are some tips for creating a good and well mannered Article:
  • Write uniquely It means do not try to copy and paste from other blogs. I want to say read other's blog and just catch the idea of the article and write it in your own word. This will make your content unique. 
  • If possible add images and video to your blog post. People really search the easiest method of understanding. These image and videos make your blog post recognizable. 
  • If need do not hesitate to use bullet and number.
  • If you are linking your post to other post or blog use html code for short your URL.
  • Use font and color to highlight the important part of your blog post.
2. Social Media - No doubt facebook, twitter and google + is the most popular social network website in these days. If you do not have any account with these social network website now time to create these accounts. Make account on most of social networking website you do not need to create account in every social network websites, choose Top 10 Most popular Social Networking website and sign up those website. Now, connect with your visitors with facebook and twitter etc.. Join facebook groups and follow twitters related to your topic and whenever you write New articles on the basic of those topics, share your post on those groups.

3. Leave comments on other Blog - Read other's blogs/sites and concentrate on the comments. Is there any comment which is related to your topic or may be he is asking some question and you can help him by replying your comments with your own link. Let me explain you little bit more for example I visit a website and the topic of website is How to Make Money online. I am concentrating in the comment section there one person asked a question "Can you please tell me How can I make money through my blog I am new to this field" aahaa... This is what i have covered in my previous post on my blog so just simply reply him/her "You can make money from your blog by advertising some ads in your blog and many more methods, visit this link for more information - Earn Money Online . I just attached my blog link to this comment.

4. Email Marketing  - This is also a good source of generating your blog traffic. You can add your website link into your Email Signature. Collect some email data and do this work but beware this can be spam for others.

5. Guest Post - Guest posting is a great way to attract visitors. Write some post as a guest post for other blog and leave your web link into those post but it should be high quality post.

6. Participate in forums - Now a days there are many forums in web world. You just need to choose  forum which is suitable for your blog or related to your blog. There are many visitors who are active so you do not need to do much more activities on those forums just create a new topic and write an article and leave your web link with your article. I am sure this will help you to get traffic for your blog.

Like it ? Share it.

Advance Introduction About Blogger Part 2


As we have already discussed about some topic for the beginners on Advance Introduction About Blogger Part 1. So, Now we are going to discuss Part 2. Really basic things are required to create a professional blog for your own business or for Personal use. Let's Start...
1. This is Layout window.
In this window:
  • Change Your Blog's Favicon
  • Add new Gadget to your blog
  • Customize your blog post
(Click image for large view)

2. This is Template window.
In This Window:
  • You can customize your Template
  • You can Edit your Template's HTML 
  • You can Enable/Disable Mobile View for your blog
  • You can change your blog Template 
  • You can create Backup/Restore for blog

3. This is Setting Basic Window.
In this window:
  • You can change your blog title 
  • You can write description about your blog
  • You can convert your blogspot into a Top Level Domain
  • You can Enable/Disable google search engine feature
  • You can choose your blog readers
  • You can make new Admin/Authors for your blog  
4. This is Setting  Posts and Comments windows.
In this window:
  • You can setup how many post you want to show in your home page
  • You can choose who can comment in your blog

5. This is Setting  Mobile and Email window.
  • Add mobile device, if you want to post articles from mobile.
  • Post articles through Email

6. This is Setting  Language and Formatting window:
In this window:
  • You can select Language
  • You can Enable/Disable transliteration
  • You can change your blog's Time Zone
  • You can change your blog's Time and Date Format

7. This is Setting  Search Preferences window.
In this window:
  • You can Enable/Disable Meta tags
8. This is Setting  Others window.
In this window:
  • You can Import blog
  • You can Export blog
  • You can Delete blog
(Click image for large view)
Are you a Beginner ?
  1. Create Blog on Google Blogger
  2. Advance Introduction About Blogger Part 1
  3. Create a New Post in Blogger
  4. Post Picture to Blog 
  5. How to Add Labels to Your Post
Like it ? Share it.

Advance Introduction About Blogger Part 1


This Articles will tell you everything about blog. Everything in the sense which is useful and generally you should know before/after creating a blog through google blogger. I am damn sure after this advance introduction no one will feel hesitate to create a New blog.
1. After log in you will see a structure like below image. View Image for more info.
In this window :
  • Blog Title
  • Find out Total Number of Posts
  • Find out Total Page Views
  • Create New Post 
  • Go to Post List
  • More Options
(Click image for large view)

2. Click on Overview from Menu
3. This is our Overview Window. View Image for more info
What can you do in this window :
  • Go to Blogger List
  • Create New Post
  • View Post
  • Visit Blog
  • Blog Updates
  • Blog Stats
  • Blog Traffic Source
  • Blog Audience

4. This is our Posts Window. 
In this Window:
  • You can see your published and Draft Posts
  • All Posts 
  • Post's Labels
  • Author Name
  • You can Publish your draft post.
  • You can revert your publish post to draft
  • You can Delete Post
  • Total number of comments
  • Total number of Post Views

5. This window will show you only your draft posts.

6. This window will show you only your published posts.

7. This is Pages window. 
In this Window:
  • You can create a New Pages
  • You can see or rearrange your published and draft Pages.

8. This is Comments Window.
In this Window:
  • You can manage your published and spam comments 
  • You can moderate your comments 
  • You can see your commentator's name

9. This is Google+ window. Using this option you can connect your blog to Your Google+ account. This is useful for gaining the traffic.

10. This is Adsense window. Everyone wants to make money online so this is the option for making money online through blog. 
(Click image for large view)

Are you a Beginner ?
  1. Create Blog on Google Blogger
  2. Advance Introduction About Blogger Part 2
  3. Create a New Post in Blogger
  4. Post Picture to Blog 
  5. How to Add Labels to Your Post
Like it ? Share it.

How to Add Labels to Your Post


Label helps you to categories all posts in your blog.Labels are also known as Tags   It makes your visitors to catch the category very easily from a group.
1. After Clicking on New Post You will see a Menu in your right hand side. There you need to click on 'Lables'.
(Click image for large view)

2. Write whatever labels you like, separating them with commas. Ex - blog, widget, blog tips. 
3. When you publish your post, the labels will be listed with it.Look the below image, where Labels are listed under posts.
(Click image for large view)

Are you a Beginner ?
  1. Create Blog on Google Blogger
  2. Advance Introduction About Blogger Part 1
  3. Advance Introduction About Blogger Part 2
  4. Create a New Post in Blogger
  5. Post Picture to Blog 
Like it ? Share it.

Post Picture to Blog


Pictures are really a expressive thing in your blog for your visitors and readers. In Internet our pictures are our expression. In This Article we will learn how can you post a picture in your blogger.
1. Click Image Icon in Post Editor's Toolbar
(Click image for large view)

2. When you click this icon, you'll get a window that allows you to select an image or multiple images from your computer. Here I want to explain each topic :-
Upload - Choose this when you want to upload a picture from your computer.
From this blog - Choose this when you have already uploaded image and you want to use it again. 
From Picasa Web Albums - Choose this when you have create a picasa web albums and stored your images there.
From Your Phone - Photos from your phone is a part of Google+ for Android and iPhone.
From Your Webcam - Capture a picture directly from your webcam. need to set it up.
From a URL - Just Paste a picture url.
3. As above we used "Upload" Option so after clicking on Choose files a window will appear, simply choose your pictures and Click Open.

4. In this window you will notice your pictures are uploading. It takes time when you upload more picture at a time. After uploading all pictures, Click Add selected. 
Note - I have noticed that after uploading picture when you click Add Selected all picture will be inserted in your Post so better Click on Cancel once then follow Step 1 and Step 2 again. then select your picture and click on Add Selected.

5. Done
(Click image for large view)
Are you a Beginner ?
  1. Create Blog on Google Blogger
  2. Advance Introduction About Blogger Part 1
  3. Advance Introduction About Blogger Part 2
  4. Create a New Post in Blogger
  5. How to Add Labels to Your Post
Like it ? Share it.

Contact Us

24x7 online , we happy to answer you
tamilcypc@gmail.com

Disclaimer

This Blog and its TUT's are intended for educational purposes only, no-one involved in the creation of this TuT may be held responsible for any illegal acts brought about by this Blog or TuT.


Featured Post

Custom Domains And HTTPS Redirection Code